Oreka 4.20 Administrator Manual
Revision 4.20-14297
Copyright © 2023 OrecX LLC
Table of Contents
- Introduction
- Pre-requisites
- OrkAudio
- OrkWebApps
- Overview
- Installation and Upgrade
- Applying OrkWebApps License File
- Files Location
- Running OrkWebApps
- Accessing OrkWebApps
- Recordings
- Tags
- Users
- Groups
- Roles
- Programs
- Media Servers, Services and Media Access Modes
- Live Monitoring (On-Demand Recording)
- Quality Monitoring (QM)
- Security
- Foreign Language Support
- Migrating OrkWebApps to Another Server
- OrkTrack Clustering
- Branding
- Configuration
- API
- FAQ
- Glossary
Introduction
What is Oreka
Oreka is an enterprise cross-platform system for recording and retrieval of audio streams, computer screens, and text messages (SMS). It supports recording from VoIP telephony systems via active and passive recording methods It also supports recording from TDM telephony systems. An optional quality monitoring module makes it a perfect tool for measuring call center performance and track its progress. The Oreka user interface (OrkWebApps) is web-based and provides a rich feature set such as call live monitoring, recordings playback, extensive search and query capabilities, audit trail, reporting, tagging, media manager, and many others.
Architecture
The Oreka system consists of a combination of the following services
- OrkAudio : this is the audio capture background service. It supports active and passive VoIP recording as well as TDM based recording.
- OrkWebApps:
- OrkTrack : this service centrally tracks activity on the entire system and logs recordings to any popular SQL database. It is also responsible for backgroud tasks such as the Media Manager, User and Group Auto-Provisioning as well as most API functionality through a RESTful interface.
- OrkUI : this is the web interface accessible via any standard compliant web browser.
- OrkWeb : this is an obsolete web interface that has been replaced by OrkUI.
- OrkRfb : this is the screen capture background service. It relies on the RFB protocol used in VNC.
- A range of CTI connectors : these are software services that perform Computer Telephony Integration and extract call metadata from various telephony systems such as Avaya, Cisco, Genesys, Mitel, Shoretel, etc.
The system supports multiple instances of OrkAudio and OrkRfb reporting to OrkTrack so that multiple recording servers can be seen as one recording system. OrkTrack and OrkUI are installed as one package called OrkWebApps. They may reside on the same server as the recorder or on a different server.
For the sake of simplicity, Oreka TR will be referred to simply as Oreka in the rest of this document.
Pre-requisites
Server Specs
The most important parameter for performance is CPU L2 cache. Recording higher number of concurrent calls is facilitated by using big CPU L2 caches such as 12 MB or even more.
Running Oreka in Virtual Machines (VM) is supported
Test machine (PC or Laptop or VM)
- Dual core CPU, 2MB L2 cache
- 2 GB RAM
- 500 MB Hard Drive
Production Server or VM
- 0-100 concurrent calls: Dual Core CPU, 4MB L2 Cache, 4 GB RAM
- 100-300 concurrent calls: Quad Core CPU, 8MB L2 cache, 8 GB RAM
- Above 300 concurrent calls: 4 CPU cores and 4GB RAM per OrkAudio engine with up to 400 calls per engine (for a total of up to 2000 concurrent calls on a single physical server)
Operating System
Oreka TR runs on Linux and Windows platforms. OrecX's preferred Linux platform is RHEL8 64-bit while Windows 10+ and Windows 2012+ server are also supported.
For support of other operating systems, please inquire at support@orecx.com .
Database
MariaDB is recommended as Orecx LLC's primary database environment. Oreka also supports most major database systems including MySQL, MSSQL and PostgreSQL.
Active Recording Methods
Oreka can record telephony audio via various active recording methods such as IETF SIPREC (For BroadWorks, Metaswitch, Oracle SBC, Sonus SBC, ...), Cisco BIB and Avaya DMCC. When an active recording method is chosen, the recorder becomes an integral part of the telephony platform and interacts with it. Advantages of active recording methods are:
- The recorder is typically only exposed to the wanted traffic rather than to the global traffic. This increases scalability, especially in use cases where only a small fraction of the traffic needs to be recorded
- Losing recordings under intense traffic is less likely
For more details on active recording methods, please contact support@orecx.com
Passive Recording (via port mirroring)
Passive recording via port mirroring means that the recorder does not interact with the telephony platform and silently intercepts packets and reconstructs voice sessions before saving them as audio and metadata. Advantages of port mirroring are therefore:
- No licenses need to be acquired for the telephony platform's active recording interface, which makes the recording system more cost effective
- The recording application has no impact whatsoever on the main telephony platform
- It is possible to record many more types of telephony platforms via port mirroring than via active recording because a lot of telephony platforms do not offer an option for active recording
Before Oreka can start recording, ensure that VoIP traffic is seen on a server interface. Use SPAN port mirroring to get the right traffic to the Oreka server. Two configurations are possible:
- SPAN monitoring the entire VoIP VLAN so that all traffic to and from phones is intercepted;
- SPAN monitoring the PSTN Gateways and the Signalling server (e.g. SIP proxy, Cisco Call Manager, Avaya Communication Manager, ...)
This is to ensure that both the media traffic (RTP) and signalling (SIP, Skinny, H.323, UNISTIM, ...) are intercepted by the recorder. Use a packet analyzer such as the free Wireshark tool to verify that both types of packets are appearing on the Oreka server's interface.
Once the VoIP traffic appears on the server, you are ready to start using the Oreka software.
Mechanisms to get VoIP traffic
In terms of insertion point, Oreka can intercept packets via several mechanisms:
- Ethernet switch SPAN monitoring port: for Ethernet switches that have this capability. For Cisco, see http://www.cisco.com/en/US/products/hw/switches/ps708/products_tech_note09186a008015c612.shtml . This is the most popular solution.
- Ethernet tap: requires additional hardware, this option has become fairly cheap lately. See Netoptics Teeny Tap or Barracuda Ethernet Tap products for example.
- Being installed directly on the PBX or media gateway server. Not ideal.
- Old style Ethernet hub inserted in the Ethernet path, i.e. all traffic copied to all ports. Not recommended, do this only for testing or low traffic sites.
- Setup the machine as an Ethernet bridge inserted in the Ethernet path. Not recommended, do this only for testing.
About Audio Recording Files
Oreka uses the compressed GSM WAV format to store audio recording files. This format is extremely universal and compact and can be played back on any media player.
This format uses about 1.6 KBytes for 1 sec of recording (or 13 kbits/sec). As an example, 2,000 hours of audio would require approximately 10 GBs of disk space.
About Screen Recording Files
Oreka uses the compressed FBS file format to store screen video recording files. This format is also used by some open source tools such as rfbproxy and tightvnc. The format is very efficient at losslessly storing screen updates compared to regular video codecs such as MPEG4 or h.264.
The bandwidth/storage requirements can vary greatly depending on screen size and how much the screens changes during recording. We have found the average storage requirement for a call center is about 1 MByte/min which translates to a bandwidth of about 133 Kbit/s per concurrent recording session.
OrkAudio
Overview
OrkAudio is the Oreka audio recorder component. It is a process that runs on Windows or Linux and records audio packets received on one of the server interfaces. It can record VoIP packets as well as TDM-based voice calls.
Typical Installation (Single Server)
On Linux
Here are the steps to install OrkAudio using installers on CentOS or Red Hat Enterprise Linux (RHEL).
Requirements
- You need a minimal installation of CentOS or RHEL. A graphical desktop is not required.
- You need to be logged in as "root" to install the Oreka software.
Installation
- Use the installer file provided to you by OrecX, e.g. orkaudio-1.2-660-x1459-i386.centos5-installer.sh.tar
- Untar it: tar -xvf orkaudio-1.2-660-x1459-i386.centos5-installer.sh.tar
- Run the installer: ./orkaudio-1.2-660-x1459-i386.centos5-installer.sh (accept all required components)
- If the installer fails, please contact support@orecx.com . It is also possible to attempt the procedure in
On Windows
Requirements
- You need to be logged in as Administrator before proceeding.
- Access to the internet is highly recommended for download of the Oreka software.
Installation
Use the installer file provided to you by OrecX, e.g. orkaudio-1.2-657-x1463-win32-installer.zip . Copy this file to a temporary folder on the target machine, unzip it and run the embedded executable. This will install WinPcap as well as OrkAudio.
Multiple Server Configuration (OrkAudio)
When installing Oreka on multiple servers, one or more OrkAudio recording servers are reporting to a single OrkWebApps central server. In this case, additional configuration in both OrkWebApps and OrkAudio is required.
Communication with OrkTrack
The recorder needs to communicate to OrkTrack to report the recording metadata to be stored in the database. Thus, it needs to know where OrkTrack is running.
Make sure the <TrackerHostname> entry in the OrkAudio config.xml is properly set to the OrkWebApps hostname or IP address.
OrkWebApps access to media files
For OrkWebApps to be able to access the media files stored on the recorder's server, a web server application such as Apache httpd or Apache Tomcat needs to be installed and configured on the recorder's server. For a quick solution, use the OrkWebApps installer and install only the Tomcat and Java Run-Time components. E.g., run ./orkwebapps-2.90-11509-x64-rhel8-installer.sh.tar --nomysql --nooreka on Linux. In Windows, you can stop the installer after Java and Tomcat are installed.
OrkWebApps also needs some special configuration, please refer to Media Servers, Services and Media Access Modes
For more details, contact support@orecx.com .
Applying OrkAudio License File
For OrkAudio to run properly, a license file must be applied. This file is provided to you by OrecX (e.g. orkaudio-30-days-trial-license-20090320.txt ). Store this file in the folder where OrkAudio was installed, typically /etc/orkaudio on Linux and C:\Program Files\OrkAudio on Windows. Make sure to rename it to license.txt .
Warning: under Windows, you need to make sure file extensions are shown (go to My Computer/Explore/Tools/Folder Options/View and uncheck "Hide extensions for known file types"). Otherwise you risk naming the file licence.txt.txt without realizing it.
Whenever a new license file is applied, the orkaudio service must be restarted for the change to take effect.
Upgrade
Upgrade with RPM installer (Linux)
In this procedure, please replace version numbers with the relevant ones.
Take a backup copy of the entire /etc/orkaudio directory, e.g:
# cp -r /etc/orkaudio/ /tmp/backup-etc-orkaudio
Download and upgrade to the new version:
# service orkaudio stop
# wget --http-user=orecxaccess --http-password=XXXXXXXXXXXX http://files.orecx.com/orecx/company/orkaudio-commercial-2.70-1686.x8127.x86_64.centos7.gcc48-installer.tar
# tar xvf orkaudio-commercial-2.70-1686.x8127.x86_64.centos7.gcc48-installer.tar
# chmod +x orkaudio-commercial-2.70-1686.x8127.x86_64.centos7.gcc48-installer
# ./orkaudio-commercial-2.70-1686.x8127.x86_64.centos7.gcc48-installer
# service orkaudio start
Upgrade with individual RPM files (Linux)
In this procedure, please replace version numbers with the relevant ones.
Take a backup copy of the entire /etc/orkaudio directory, e.g:
# cp -r /etc/orkaudio/ /tmp/backup-etc-orkaudio
Download and upgrade to the new version:
# service orkaudio stop
# wget --http-user=orecxaccess --http-password=XXXXXXXXXXXX http://files.orecx.com/orecx/company/orkaudio-commercial-2.51_1292x6999.x86_64.centos7.gcc48.rpm
# yum upgrade orkaudio-commercial-2.85_1728x8354.x86_64.centos7.gcc48.rpm
# service orkaudio start
Upgrade with Windows installer
- Take a backup copy of the orkaudio directory under Program Files
- Stop the orkaudio service
- Uninstall previous version OrkAudio
- Run the latest orkaudio installer (e.g. orkaudio-1.2-657-x1463-win32-installer.exe)
- If any custom changes had been made to the old config.xml or logging.properties files such as IP filtering or NIC selection, apply those changes to the new files (do not simply overwrite the new files with the old ones, some configuration settings might have changed between the two versions)
Upgrade with Windows binary archive
- Stop the OrkAudio service
- Unpack the orkaudio zip archive downloaded from your OrecX space (e.g orkaudio-1.2-688-x1537.zip)
- Select and copy all files inside the top directory. This should include orkaudio.exe, some .dll files as well as subdirectories
- Paste the files on top of your orkaudio install directory so that all .exe and .dll files are all replaced by the new ones in the archive
- When done, all replaced files are usually seen as selected in the Windows file explorer This can give you a good indication of the success of the operation
- Restart the OrkAudio service
Files Location
Audio Output Files
Audio output files are written to the c:\oreka\audio under Windows and in /var/log/orkaudio under Linux by default.
Audio files are classified according to the following default scheme (see also TapeFileNaming and TapePathNaming in File and Path Names in OrkAudio ):
yyyy/MM/dd/hh
Audio file themselves are named after the following scheme:
yyyyMMdd_hhmmss_trackingID.extension
You can modify the audio files location by editing the <AudioOutputPath> configuration parameter described in Configuration . Note that if this parameter is changed, OrkWebApps needs to be told where to look for the recordings. This requires modifying Tomcat's $tomcat/conf/server.xml file to update the context path docBase parameter accordingly:
<Context path="/audio" docBase="c:/oreka/audio/" ></Context>
If this parameter does not exist already, just add it under the <Host> section. Don't forget to restart Tomcat after this change.
Configuration Files
OrkAudio configuration files are located in the install directory under Windows and in /etc/oreka under Linux. The files are:
- config.xml : this is the main OrkAudio configuration file. Plugins also read their configration parameters from subsections of this file. Please see Configuration for more details.
- logging.properties : this is the log4j logging configuration file which allows for great flexibility in logging scope and output format. Please see http://logging.apache.org/log4j/1.2/manual.html
Log Files
Log files are located in the install directory under Windows and in /var/log/oreka under Linux. By default, Oreka produces the following output:
- orkaudio.log : this is the main OrkAudio logfile.
- tapelist.log : this logfile contains the details (metadata) for each recording that was performed by OrkAudio.
- messages.log : : this log file contains a subset of details (metadata) for each recording that was performed by OrkAudio. Useful for re-creating database entries.
Plugins Files
Plugins exist as dll files under Windows and as DSO (Dynamic Shared Objects) with .so extensions under Linux. They are located in {OrkAudioInstallDirectory}/audiocaptureplugins under Windows and in /usr/lib under Linux.
- VoIp.dll - libvoip.so : VoIP recording plugin for SIP, Cisco Skinny and pure RTP protocols.
- H323voip.dll : VoIP recording plugin for H.323, Avaya, Nortel UNISTIM and MGCP protocols.
- SoundDevice.dll - libsounddevice.so : Sound Card based recording
- Generator.dll - libgenerator.so : Audio generator for faking audio capture (useful when testing)
Audio Encodings and Formats
Wire audio encodings
Wire audio encodings are detected automatically by OrkAudio. Audio is not usually stored in its original wire format. Audio is recorded in real time to mcf files in order to maximize capturing performance and is later transcoded to the final storage format as specified in Storage audio formats . The following encodings are supported:
- G.711 ulaw
- G.711 alaw
- GSM 6.10
- iLBC
- G.729A
- G.723.1
- G.722
Storage audio formats
The storage format is the file format used to archive recordings to disk. Mcf capture files are transcoded from the wire encoding to the final storage format on a best effort basis. All possible storage encodings are currently wrapped into the wav container format. This means that all generated audio files have a .wav file extension and easily play on any existing Windows or Linux media player. The following formats are supported, please see Configuration for more details.
- GSM 6.10 wav : default format
- G.711 ulaw wav
- G.711 alaw wav
- PCM wav : uncompressed audio, not recommended.
Configuration
Basic Configuration
Configuration of OrkAudio and its plugins is performed by modifying the config.xml file (see also Configuration Files ). Core OrkAudio configuring parameters are the following:
<AudioOutputPath> : this parameter controls the root directory where capture and storage audio files are stored. It can be a relative or absolute path.
<CapturePlugin> : this parameter controls which audio capture plugin should be used. Valid values are VoIP.dll and libh323voip.dll in Windows, and libvoip.so and libh323voip.so under Linux.
<TrackerHostname> : the hostname or IP address of the server where OrkTrack (a component installed with OrkWebApps) resides. If you use the OrkTrack hostname instead of the IP address (recommended), make sure that DNS is set up correctly and that you can ping that hostname from this OrkAudio server. Exemple:
<TrackerHostname>my-orktrack-server1</TrackerHostname>
You can also enter several orktrack engines, e.g. for redundancy. They must be comma separated. When using non-standard TCP ports for OrkWebApps (standard is port 8080), it is possible to specify them in the hostname:port format. For example, if one tracker is on port 8080 and the second tracker is on port 80:
<TrackerHostname>my-orktrack-server1:8080, my-orktrack-server2:80</TrackerHostname>
<StorageAudioFormat> : this parameter controls the final file format of the tapes. Valid values are the following: gsm, ulaw, alaw and pcmwav. "gsm" is the default value and is the best compression rate available. All values generate wav files with various degrees of compression.
<TapeProcessors> : usually set to BatchProcessing, Reporting. Reporting ensures that the metadata about recordings is "reported" to the database through OrkTrack.
<DeleteNativeFile> : this parameter allows you to keep the uncompressed .mcf file even after the transcoding to the .wav is complete. The default is "yes". Set it to "no" to keep the .mcf file.
<TapeDurationMinimumSec> : minimum duration in seconds for a call to be recorded.
<AllowAutomaticRecording> : if set to "yes" (default setting), calls will be recorded by default. "no" indicates that only explicitly requested recording will occur (e.g. from Live Monitoring in OrkWebApps).
<LookBackRecording> : if set to "yes" (default), will always record the call from the beginning regardless of when the request to start the recording was initiated, while a "no" setting will record only from the time the request was made.
File and Path Names in OrkAudio
It is possible to configure the path to which audio files are written as well as the audio file names through dynamic parameters
First, the TapeFileNaming tape processor needs to be added to the list of processors in the top node of the orkaudio config.xml file:
<TapeProcessors>BatchProcessing, TapeFileNaming, Reporting</TapeProcessors>
Secondly, the <TapeFileNaming> and/or <TapePathNaming> must also be added in the top node of the orkaudio config.xml file. They both contain a CSV list of elements. If an element appears between square brackets, it will be replaced by the value corresponding to the keyword. If an element appears without square brackets, it will be used verbatim in the file name. Example:
<TapeFileNaming>myrecordings-,[nativecallid]</TapeFileNaming>
with a native call ID of FDBCE@69.13.45.6 will result in the following file name: myrecordings-FDBCE@69.13.45.6.wav .
If the TapeFileNaming parameter is missing, the default naming scheme applies which is a timestamp plus the internal trackingID.
If the TapePathNaming parameter is missing, recordings are distributed to the default year/month/day/hour folder tree structure described in Files Location .
Note: TapePathNaming configuration is always relative to AudioOutputPath.
Here is a list of acceptable keywords for tape and path naming:
- [nativecallid]: this is the call ID extracted from the underlying protocol (SIP, Cisco Skinny, ...)
- [trackingid]: this is the internal Oreka tracking ID
- [direction]: in, out or unkn
- [shortdirection]: I, O or U
- [remoteparty]
- [localentrypoint]
- [localparty]
- [localip]
- [remoteip]
- [hostname]
- [year]
- [day]
- [month]
- [hour] in 24 hours format
- [min]
- [sec]
You can also use any tag or additional custom extracted field in file names by using its tag/field name as a key. e.g for a SIP field called X-Unique-ID, add [X-Unique-ID] to TapeFileNaming or TapePathNaming. See also Extracting arbitrary fields from SIP headers
Additional example:
<TapeFileNaming>myrecording,[hour],[min],[sec],_,[shortdirection],_,[remoteparty],_,[localparty],_,[hostname]</TapeFileNaming>
<TapePathNaming>mypathprefix/,[year],[month],/,[day]</TapePathNaming>
Configuring the VoIP plugin
VoIP plugin specific configuration is found in the config.xml file under the VoIpPlugin tag. Many options are available for this plugin, such as limiting traffic, blocking traffic from/to a specific IP address, ... The default config.xml has some of the main options listed in it and commented out. If any of these parameters are not documented here, please contact support@orecx.com for more details.
Selecting Network Device(s) to intercept traffic from
It is possible to configure the network device to monitor for VoIP traffic using the <Devices> directive. While OrkAudio attempts to automatically select the server interface on which it detects VoIP traffic, you may need to configure the interface manually if orkaudio.log shows no sign of traffic. E.g.
In Windows:
<Devices>\Device\NPF_{E0E496FA-DABF-47C1-97C2-DD914DFD3354}</Devices>
In Linux:
<Devices>eth2</Devices>
Several comma-separated interfaces may be configured in the examples above
IP addresses based filtering
Filtering based on IP addresses or CIDR style subnets is available via the PcapFilter parameter, e.g.
<PcapFilter>host 192.168.0.34 or net 192.168.1.0/24</PcapFilter>
In the example above, only packets coming from or going to either IP address 192.168.0.34 or any address within the 192.168.1.x range will be retained. Any other packet will be ignored. The syntax is the standard tcpdump syntax as describe here: http://wiki.wireshark.org/CaptureFilters.
Extracting arbitrary fields from SIP headers
It is possible to configure the VoIP plugin to extract any given standard or custom added SIP field by adding the following configuration parameter and specifying the wanted fields as a csv list (field names simply need to appear exactly as they appear in the SIP headers as viewed e.g via wireshark):
<SipExtractFields>contact, max-forwards, X-UNIQUE-ID</SipExtractFields>
After the change, the extracted fields will start appearing in OrkWebApps as tags in the detailed recording view (when clicking on a recording's timestamp) and will become searchable via the tag name/tag text search boxes. They will also appear as tags in the tape messages that can be found in orkaudio.log
Live Monitoring
For Live Monitoring from OrkWebApps to work, the 59120 port must be accessible on the server where OrkAudio is running. In Linux check the iptables settings. in Windows, the firewall settings.
See also Live Monitoring (On-Demand Recording) for configuring OrkWebApps.
Running OrkAudio
Make sure the OrkAudio license file is properly applied. Refer to Applying OrkAudio License File .
Starting the OrkAudio service
Under Windows, start the OrkAudio service in Service Management (start/run/services.msc).
Under Linux, start the OrkAudio service by typing service orkaudio start on the command line.
Verifying that OrkAudio started
You might need to double-check that the orkaudio service was started correctly.
In Linux, use the following command:
# ps -ef | grep orkaudio
A line showing that orkaudio is running must appear:
root     32071     1  0 10:02 ?        00:00:00
/usr/sbin/orkaudio
In Windows' Service Management tool (start/run/services.msc), ensure that the orkaudio service is started
OrkAudio Auto-Start
During installation using the official installers, OrkAudio will install itself as an automatic service, i.e. a service that restarts automatically if the server is rebooted. This is important in the case of power failure, maintenance or other unpredictable events that may cause the system to fail or be restarted. Ensure that the service is configured properly as follows:
- In Windows' Service Management tool (start/run/services.msc), right click on the orkaudio service and ensure that the Startup type is set to Automatic
- In Linux, the command "chkconfig -- list orkaudio" should yield a response such as below:
# orkaudio 0:off 1:off 2:on 3:on 4:on 5:on 6:off
If not, chkconfig orkaudio on will need to be executed.
Migrating OrkAudio to Another Server
To move OrkAudio to a different server with the same operating system follow the procedure below:
- Stop the orkaudio service on the old server
- Install OrkAudio (refer to ) on the new server
- Copy the OrkAudio configuration files and license file from the old server to the new server: config.xml , logging.properties and license.txt , in the OrkAudio installation folder
- Copy all the audio files and folders to the new server
- Start the OrkAudio service on the new server
Load balancing - orkbalancer
The Oreka load balancer (orkbalancer) is a software service that can take a high amount of VoIP traffic and share it across multiple core recorders (orkaudio). Traffic input can come from one or more network interfaces and be distributed to any number of recorders. Recorders are specified by their IP addresses and ports, meaning that:
- It is possible to run recorders on the same host as the balancer or on separate servers.
- It is possible to run multiple recorders on a given server, thereby reaping the benefits of using servers with lots of cores.
The load balancer ensures that the RTP media traffic is well balanced between the recording targets and uses a round robin algorithm. The two directions of a given RTP exchange are always sent to the same recorder so that bidirectional conversations can be recorded. Any non-RTP traffic is sent to all recorders, meaning that signalling traffic is automatically distributed to all recorders.
orkbalancer currently only runs on Linux CentOS targets.
The configuration file for orkbalancer is the following file: /etc/orkbalancer/config.xml
In order to control from what network interfaces the orkbalancer should listen from (port mirroring NICs):
<HostDevicesList>eth0, eth1</HostDevicesList>
In order to control between which orkaudio targets the traffic should be balanced:
<LoadBalancingTargets>127.0.0.1:20000,192.168.0.10:20000,192.168.0.11:20002</LoadBalancingTargets>
The LoadBalancingTargets ports should be spaced by two units, e.g. if one target is on port 20000, the next target should be at least on port 20002. This is because signalling and media traffic are sent to two consecutive ports.
Any participating orkaudio target should be configured correctly for load balancing by adding the following in the orkaudio config.xml under the VoIpPlugin node:
<OrekaEncapsulationMode>true</OrekaEncapsulationMode>
<OrekaEncapsulationPort>20000</OrekaEncapsulationPort>
OrkWebApps
Overview
OrkWebApps is a collection of applications that provides post-capture value-added functionality. The applications are:
- OrkUI : web-based user interface
- OrkWeb : web-based user interface (legacy, discontinued and no longer supported)
- OrkTrack : tracker receiving metadata about recordings from OrkAudio and CTI connectors, storing them in the database, managing database transactions, providing a API access to resources and functionality as well as many other metadata and media file management functions
These applications are typically deployed and installed together.
Installation and Upgrade
For how to install or upgrade OrkWebApps on Linux or Windows, please refer to the following documents:
Applying OrkWebApps License File
To apply the OrkWebApps license file, e.g. orkweb-30-days-trial-license-20220705.txt, load it from the OrkUI License Info page.
Trial versus Production license
Note that there are two types of license files: trial and production. The trial type is sent to you by OrecX as a first license and allows you to record everything on the wire. It is good to start with this type of license to uncover any configuration tweaks that may be necessary.
For example, you may be seeing only the RTP streams but not the control packets, thus no phone number or extensions can be associated to calls. With a trial license, you will be able to quickly detect such a situation and correct it since all calls would be recorded and would appear in the OrkUI Browse page with the local and remote party typically showing as IP addresses.
With a production license, users must be configured in OrkWebApps with their phone numbers or extensions (or other) as a login string, for Oreka to be able to associate the local party in the VoIP packets with the configured user and thus recording the call. If no users have been configured in OrkWebApps, a production license will inhibit all recording. See also Login Strings
Before migrating to a production license, make sure all extensions, phone numbers, SIP URIs, ... that need to be recorded, are configured as login strings for defined users in OrkWebApps. The login string field must match what you see in the local party field in the Browse page.
Files Location
OrkWebApps Configuration files
OrkWebApps have a set of configuration files that allow them to know where and how to access the database, and what information to write to log files. The main configuration files can be found under /etc/orkwebapps in Linux, and typically under C:\Program Files\OrkWebApps in Windows. These folders contain 5 main files:
- database.hbm.xml : for application database access information.
- logging.properties : for application logging configuration.
- localpartyMap.csv : for mapping the local party seen by orkaudio to the one configured in OrkUI (e.g. IP address to an extension).
- remotepartyMap.csv : for mapping the local party seen by orkaudio to the one configured in OrkUI.
- config.properties : for configuring the tracker name (orktrack) and orktrack clustering options
The OrkTrack web application's web.xml file has two important parameters: ConfigDirectory and TomcatHome. The former one must point to the installation folder (e.g. /etc/orkwebapps ) while the latter points to the container folder (e.g. /opt/tomcat8). This is usually the case by default.
OrkWebApps Log files
Both the OrkWebApps applications, and the Tomcat web server have their own logging mechanisms. Below are the files of interest for both cases. All of them except catalina.out reside in /var/log/orkwebapps under Linux and typically in C:\Program Files\OrkWebApps in Windows. The level of logging is defined in the logging.properties file. Logging levels are ERROR, INFO, DEBUG and TRACE.
- orkwebapps.log : this file contains all messages logged by OrkTrack.
- orkwebapps_mm.log : this file contains only messages logged by OrkTrack's Media Manager module.
- orkwebapps_security.log : this file contains only security related messages logged by OrkTrack.
- catalina.out : this is the file where Apache Tomcat logs its own messages. It resides in the $tomcat/logs/ folder.
Running OrkWebApps
By default, OrkWebApps use port 8080 or 8443. Thus, ensure that those ports are open on the server. In Linux, you need to look at iptables, while in Windows, you can check your Firewall settings from the Control Panel.
Before starting OrkWebApps, ensure that the database server, typically MariaDB or MySQL, is running. Once done, start the Apache Tomcat service which will launch OrkWebApps.
On Linux
You can use ps -ef | grep mysqld to verify if mysqld is running, and service mysqld start to start it if it is not.
Once the MySQL is running, start the Apache Tomcat web server, e.g. service tomcat start .
On Windows
Go to Start/Run... and type services.msc. This opens the Services Manager application. Ensure that the MySQL service is running. If not, start it.
Once the MariaDB or MySQL service is running, start the Apache Tomcat web server, by right-clicking on the Apache Tomcat service and selecting Start.
Accessing OrkWebApps
Open any standard web Browser and type the following URL: http://localhost:8080/orkui. If you are accessing from a location other than the server on which Oreka was installed, replace localhost with the hostname or IP address of the Oreka server. This will bring up a login page.
Log in as user admin and enter the password that was set up at installation time. If no password was set up at installation time, the default one will be "admin" and you will be asked to modify it upon your first login.
If this is the first time you attempt to login after the installation, you will be presented with a license input screen. Copy the content of the license text file issued to you by Orecx and paste it into the text box.
Recordings
When you first login to OrkUI, you are presented with the Browse page that allows you to view a list of the most recent recordings. These recordings may be of audio or screen type. An extensive set of search filters are available on that page that allow you to zero-in on one or multiple recordings of interest. These filters include local party, remote party, start time, duration, time span, user or group to which the recording is associated, etc. Other tools available on that page are the ability to export, email or delete recordings, and they are subject to the access policies or privileges that the logged-in user is assigned. There is also access to tagging or bookmarking recordings, evaluating recordings according to a Quality Monitoring scorecard (if the QM feature is licensed) as well as viewing more details about the recording.
Tags
Oreka provides you with the ability to tag or bookmark recordings. This is a powerful tool that can be used for many purposes as explained below.
Applying a tag to a recording uses one of the configured "tag types". Tag types can be pre-defined by the system or user-defined. System tag types are usually created by the Oreka system by default at installation or automatically when certain events occur, while user-defined tag types are added manually by the users in the tag types page. Tag types are usually accessible to users based on their access policies, but it is possible to designate tag types as being public for access to all users in the system.
It is important to distinguish between a tag and a tag type: a tag type is a category of tag that might be used to apply to any recording, while the tag itself is the actual application of a given tag type to a specific recording.
Tags have the following attributes:
- Tag type: the type or category of the tag to be applied, e.g. Monitored, Agent, Patient ID, ...
- Tag text: a complementary description of the tag type application. For example, a tag of type "Credit Card" would have the credit card number entered as a tag text.
- Offset (in seconds): offset in seconds from the beginning of the recording where this tag applies. This is very useful for analytics-related bookmarking, among others, to indicate when a specific word or phrase was uttered or the starting point of a particular area in the media file.
- Duration (in seconds): duration in seconds of the tag starting from the offset. For example, it can be used to describe the length of a silence or a specific topic in the recording.
System Tag Types
System tag types may be pre-defined by the system at installation or applied automatically at the occurrence of specific events. Some of the most common automatic or system tag types are the following:
- Monitored: automatically applied to a recording when a user listens to a call in the Live Monitoring page.
- Recordings metadata: additional recording metadata such as nativecallid, on-demand, ucid, split, hunt group, ... some of which are only obtainable through an additional CTI connector.
- Agent and Agent Group: applied to a recording when it is subject to Agent Tracking - typically used on systems with hotdesking.
- Speech Analytics keywords: these keywords configured in Speech Analytics profiles are automatically applied when the Speech Analytics engine detects them in an audio recording.
User-Defined Tag Types
User-defined tag types are defined and applied manually by users or through the Oreka API. Here are some examples of common uses:
- Applying a tag type such as Reviewed to indicate that the call was reviewed by a manager.
- Applying a tag type such as Patient ID and adding the actual ID as a tag text.
- Bookmarking a spot in the recording where the agent yelled at a customer. The spot in the recording may be specified with the offset.
- Bookmarking a recording with the Credit Card tag type, and adding the credit card number as tag text, the time it was uttered at as tag offset and the time length it lasted as duration. This can be useful with PCI compliance where the credit card info acquisition is omitted from the audio recording.
Using Tags
Tags may be applied in one of three ways:
- In OrkWebApps manually by the user from the Browse page by clicking on the tag icon.
- In OrkWebApps manually by the user from the recordings details page.
- By API, using one of the addtag API variations.
Tags are listed in the recordings details page. They are also displayed on the OrkMPx media player, when hovering over them. Tags may be used as search criteria to list recordings, but they may also be used as criteria in Audio programs or Media Manager copy, move and delete programs giving great flexibility in terms of filtering capabilities.
Users
OrkWebApps users are managed in the Users page. It is possible to create, edit, disable and delete users. You can also configure users to be recordable or not. Non-recordable users are typically users who have administrative privileges, and do count against the licensed user limit (but not the user recordable limit).
Your license key limits the number of active users you can have at any point in time. To free a few licenses, you can delete users or simply disable them. Being disabled, they will still be visible but no new recordings will be associated to them and those disabled users won't be able to log into OrkWebApps.
There is one pre-defined and non-editable user in OrkWebApps: "admin". This user has all the possible privileges or access policies enabled, and is reserved for the main administrator.
Login Strings
Each user can have multiple login strings entered as a csv list of text strings. Those login strings serve two purposes:
- They act as unique identifiers for OrkWebApps users.
- They specify what phone numbers or extensions are to be recorded.
When a new call occurs, if the local party field, as would be seen in the OrkWebApps Browse page, matches one of the user's login strings, the recording will be associated to that user. The login string matching is case sensitive .
For example, Tom's login strings might be " tom, 5312 ". Any call to extension 5312 will be associated to Tom, and Tom will be able to log into OrkWebApps using either " tom " or "5312" as an identifier (assuming Tom has a password defined. OrkWebApps login is denied for users with blank passwords).
Configuration of users and login strings is very important for correct behavior when using production licenses. Refer to Trial versus Production license
Importing CSV List of Users
When you have a great number of users to provision in OrkWebApps, it could be a daunting task to create them all, one at a time, from the UI's Users page. In this case, you can use the Import Users feature available on that page. This feature allows you to import a comma-separate list of users directly into OrkWebApps. Below is a sample file format:
#BULK_USER_IMPORT
#First Name, Last Name, LoginString, Password, Recordable, Force Password Change, Email, Group, External User
John,Smith,jsmith@abc.com,abcdefg,true,false,,Sales Group
Jane,Doe,jdoe@abc.com,1234567,true,false,jdoe@abc.com,,true
Only the firstname and lastname fields are mandatory. The rest can be left blank if not required. Also, only one login string can be entered on one line. The "recordable" and "force password change" fields can be set to "false"/"true", "0"/"1" or "no"/"yes". The "force password change" field, if set, forces the corresponding user to change their password the next time they login. This is mainly useful when defining new users.
There are three other global settings that can be configured when importing users: "Keep old login strings", "Recordable" and "Enable".
- Keep old login strings allows you to select whether a user in the csv list that already exists in OrkWebApps should have their login string(s) replaced by the login string in the imported file, or whether the new login string is to be simply added to that user's existing login string(s).
- recordable sets the default value of the recordable field for new users. It defaults to true. If the CSV entry in the file defines the recordable field for a given user, that value overrides the global setting.
- enable applies only to existing users, and selects whether it to leave them intact or enable them if they are disables. The default value is true. If true, disabled users will be enabled; if false, existing users are kept intact.
Note
- There are two ways to import multiple login strings per user.
1. Define multiple similar entries for the same user with a different login string on each line, such as
John,Smith,jsmith@abc.com,abcdefg,true,false,,Sales Group
John,Smith,312-555-1234,abcdefg,true,false,,Sales Group
2. Define multiple login strings on a user line, all separated by semi-colons as shown below
John,Smith,jsmith@abc.com;312-555-1234,abcdefg,true,false,,Sales Group
Local Party Mapping
Sometimes, the local party reported by the OrkAudio appears in OrkWebApps in a format that does not meet your requirements, e.g. MAC address, IP address, ... In cases where this cannot be modified at a configuration level neither at the recorder level nor at the telephony platform level, Oreka provides you with a special tool to circumvent the issue: local party mapping.
To map the local party to an extension (or other) to meet your requirements, create or edit a localpartyMap.csv file in the OrkWebApps installation folder, and add the entries following the example below:
10.10.1.1, 1540
10.10.1.2, 1541
00:08:5d:13:19:a0, 3523
SIP/SOFTHONE034, 3681
...
The first entry is what you want to replace, the second, is the target output.
Once this file is completed, restart Tomcat (or at least OrkTrack), for the new changes to take effect.
Remote Party Mapping
This is the same as the local party mapping above, but for the remote party. The file name is remotepartyMap.csv in this case.
User Auto-Provisioning (UAP)
Oreka may be configured to automatically provision users based on recordings, i.e. whenever a new recording is detected, its local party can be automatically provisioned in OrkWebApps. This feature is mainly useful in active recording setups using SIPREC, whereby the decision of what users to record is pre-configured in the telephony platform, hence ensuring that auto-provisioning will only occur for required users.
To configure UAP, first the OrkAudio config.xml configuration file needs to be updated as follows (OrkAudio needs to be restarted for this change to take effect):
<SipUAPlugin>
    <SipRecReportLocalNameAsTag>yes</SipRecReportLocalNameAsTag>
</SipUAPlugin>
Then, the following setting must be enabled in the OrkWebApps database:
orkuserconfig.userAutoProvisioning = true
orkuserconfig.uapNameSplitChars    = "_. "  or " "
The orkuserconfig.uapNameSplitChars field is usually required to contain a blank space.
The user first and last name will be obtained from the OrkAudio recorder typically in the format "firstname lastname", and will be parsed accordingly to provision the user.
Some important notes on how UAP works:
- With UAP, the recording's local party (i.e. user's login string) is key. If the local party is not found as a configured login string in OrkWebApps, it is provisioned and associated to a new recordable and external user with the corresponding first and last name. This is regardless of whether another user by the same first and last name already exists (the login string is unique in Oreka, but the not the user name.)
- UAP is subject to user and login string license limits. Once reached, no new users are auto-provisioned.
- UAP not only adds new users, it can also update existing ones. This is true only if the login string already exists and is associated to a user who is marked as external .
If you need assistance, please contact support@orecx.com .
Single Sign On (SSO)
OrkWebApps can be configured to act as a single sign on (SSO) consumer, allowing user login based on authentication from an external platform. SSO is supported for the following 3 platforms:
- Broadworks
- LDAP
- SAML
The main configuration of SSO is in the database. For SAML, there is also an OrkUI configuration component.
When Broadworks or LDAP SSO are configured, OrkWebApps will authenticate logins against those platforms, but only for users that already exist in the OrkWebApps database as "external" non-disabled users. Additionally, if SSO User Auto-Provisioning (UAP) is configured, authentication against the SSO platform, if successful, will auto-provision the user in OrkWebApps.
The database configuration is done in the database's orkuserconfig table. Here are some of the main fields to configure:
- ssoType currently supports "Broadworks", "LDAP" and "SAML". The field is not case sensitive.
- ssoURL is the URL that OrkWebApps will use to request authentication from the SSO producer. The examples below are typical URLs used for Broadworks and LDAP. $userId is a parameter that will host the login user name for Broadworks.
- ssoUap boolean can be set to true to enable SSO UAP (Single Sign On User Auto-Provisioning). It applies only to Broadworks and LDAP SSO. When enabled, if the user attempting to log into OrkWebApps does not exist, they are auto-provisioned with basic access policies ("Users" security group), and set to be "external". Otherwise, if the user already exists as "external", its attributes (mainly first name, last name and email) are updated if necessary.
Broadworks SSO
Below is a Broadworks SSO configuration example. Note that two external SSO sources may be configured, ssoURL and ssoURLSecondary for better reliability:
orkuserconfig.singleSignOn = true
orkuserconfig.ssoType = "Broadworks"
orkuserconfig.ssoURL = "https://xsp.bwvoip.net/com.broadsoft.xsi-actions/v2.0/user/$userId/profile"
orkuserconfig.ssoURLSecondary = "https://secondary.source.com/v2.0/user/$userId/profile"
LDAP SSO
Below is an LDAP SSO configuration example:
orkuserconfig.singleSignOn = true
orkuserconfig.ssoType = "LDAP"
orkuserconfig.ssoURL = "ldap://ldap.forumsys.com:389/"
orkuserconfig.ssoAuth = "simple"
orkuserconfig.ssoPrincipal = "cn=$cn,dc=example,dc=com"
The ssoPrincipal field can accept one of a few LDAP parameters to host the user name: $cn, $uid, $UserPrincipalName and $sAMAccountName. Examples:
orkuserconfig.ssoPrincipal = "cn=$cn,dc=example,dc=com"
orkuserconfig.ssoPrincipal = "uid=$uid,dc=example,dc=com"
orkuserconfig.ssoPrincipal = "sAMAccountName=$sAMAccountName,dc=example,dc=com"
orkuserconfig.ssoPrincipal = "UserPrincipalName=$UserPrincipalName,dc=example,dc=com"
SAML SSO
SAML technology allows multiple web apps to share a common login point through an authentication provider called an IDP (IDentity Provider). Each web app using the IDP through SAML is called a Service Provider (SP). SAML requires configuration at both ends, the IDP and the SP.
Detailed Functionality
- Only SAML SSO is supported for now. SAML SLO (Single Log Out) will be provided in the near future.
- SAML configuration survives upgrades. It is done in the database for OrkTrack and in a configuration file in $ORKWEB_HOME for OrkUI. See details below.
- REST API works as usual and is authenticated against the database not the IDP to allow seamless programmatic access for third party integration.
- SAML access uses the typical URL: http://localhost:8080/orkui/login .
- Non-SAML access is still allowed for admin or other through the following URL: http://localhost:8080/orkui/login?mode=sp. This authenticates against the local database instead of the IDP.
Pre-requisites
- OrkWebApps 2.70-9922 or later
- oreka-tomcat-java-deps-2.70-9901.zip or later for the 3rd party SAML libs (tomcat/shared/lib)
- Latest JCE Unlimited Extension (US Export & Local Policy) jars for Java 7. These are already included out-of-the-box with Java 8.
SP Configuration
SP SAML configuration for OrkWebApps is required for both OrkTrack and OrkUI. The OrkTrack configuration is done in the database, while OrkUI's is done in a file stored in $ORKWEB_HOME.
OrkTrack Configuration
Here is an example of a SAML configuration in OrkTrack:
| Description | Table | Key | Value Example |
|---|---|---|---|
| SAML Single Sign On | orkuserconfig | singleSignOn | true |
| ssoType | SAML | ||
| SAML SP Entity Id | orkuserconfig | samlSPEntityId | http://localhost:8080/orkui/login |
| SAML IDP Entity Id | orkuserconfig | samlIDPEntityId | https://samltest.id/saml/idp |
| SAML ACS URL | orkuserconfig | samlACSUrl | http://localhost:8080/orktrack/rest/user/login/saml |
| IDP X509 certificate | orkuserconfig | certificate | MIIDEjCCAfqgAwIBAgI.... (encrypted key) |
OrkUI Configuration
OrkUI configuration is done in the OrkUI configuration file app.config.json. This file is located in $ORKWEB_HOME/orkui which is typically /etc/orkwebapps/orkui (Linux) or C:/Program Files/OrkWebApps/orkui (Windows).
The file is a JSON file as follows:
{
  "serverHostname": null,
  "serverPort": null,
  "configOptions": {
    "edit": {
      "alwaysShow": true
    },
    "SAML": {
     "samlLoginUrl": "",
    },
    "debug": {
      "isLoggingActive": false,
      "isOrkmpxAudioExtractionEnabled": false
    }
  }
}
Change the samlLoginURL field to point it to the IDP. E.g. https://orecx.onelogin.com/trust/saml2/http-post/sso/dca8e099-2160-4bc5-b810-....
IDP Configuration
Here is a general example of IDP configuration:
| Description | Value Example | Comments |
|---|---|---|
| ACS (Assertion Consumer Service) | http://localhost:8080/orktrack/rest/user/login/saml | Points to the OrkTrack SAML login API endpoint |
| RelayState | http://localhost:8080/orkui/login | If you want to always go to a specific OrkUI page, set it to the link of that page. For example, http://localhost:8080/orkui/app/browse. |
| Audience | http://localhost:8080/orkui/login | Same as RelayState |
| Recipient | http://localhost:8080/orktrack/rest/user/login/saml | Same as ACS |
ADFS Server Configuration
ADFS is a Microsoft IDP that has its own terminology to configure the ACS, IDP and SP entities. Below is an example of what is needed on that platform:
| ADFS | Comments |
|---|---|
| Trusted URL | Equivalent to the SAML ACS (Assertion consumer Service) URL, see generic IDP configuration table above |
| Relaying Party Trust (Identifiers) | Equivalent to the SAML RelayState (Audience), see generic IDP configuration table above |
| Claim provider trust | Equivalent to the samlIDPEntityId, something like http://adfs.clientxxx.com/adfs/services/trust |
Note
Make sure to use the https protocol instead of http (8443 instead of 8080), since ADFS will not accept any http protocol urls, during the configuration.
For more information follow the link https://docs.microsoft.com/en-us/windows-server/identity/ad-fs/operations/create-a-relying-party-trust
Groups
Oreka's groups represent logical entities such as teams (e.g. sales, marketing, customer care, ...) or even different tenants. They are used to bring together users under one functionality. Groups can be useful for filtering or creating specific recording rules on a group of people. Groups can also be added as subgroups to existing groups, thereby creating a group hierarchy of any depth. A user may belong to any number of groups.
Groups can be powerful tools for applying privilege scopes, called Access Policies scopes, to a set of users. See the Managing Roles section below for more details.
Roles
Roles, previously referred to as Security Groups in OrkWeb, are a collections of Access Policies or privileges, that may be applied to the users that belong to them.
Every user in Oreka belongs to one single role which determines their access privileges. Newly created users are implicitly associated to the default Users role which has limited privileges. There are 4 immutable pre-defined roles in OrkWebApps:
- Users
- Administrators
- Group Administrators
- Supervisors
These factory default roles have sensible access policies defaults that should be sufficient for most needs and use cases. However, more roles may be created to accommodate more particular needs.
Access Policies
Each role may have one or more Access Policies. Users associated to a particular role inherit all that role's access policies. Here is a list of available Access Policies available in Oreka, grouped by the resource they apply to:
- Recordings
- View Recordings
- Play Recordings
- Delete Recordings
- Email Files
- Export Files
- View Live Recordings
- View Media Type Filter
- View Remote Party
- View Statistics
- User Provisioning
- View Users
- Edit Users
- Create Users
- Edit Login Strings
- Group Provisioning
- View Groups
- Edit Groups
- Role Provisioning
- View Roles
- Edit Roles
- Assign Users To Roles
- Program Provisioning
- View Programs
- Edit Programs
- Workstation Provisioning
- Edit Workstations
- Tags
- Edit Tag Types
- Edit Tags
- Delete Tags
- Quality Monitoring
- Edit Scorecards
- Create Evaluations
- View Evaluations
- Edit Evaluations
- Delete Evaluations
- Admin Features
- View Audit Trail
- View System Info
- Edit System Info
Additionally, Access Policies have scopes associated to them. The allowed scopes are listed below:
- None: when no Access Policy exists for a given resource in a role, users from that role have no access at all to that resource.
- Own: provides users access only to their own resource (e.g. their own recordings, tags, ...)
- Group: provides users access to their resources as well as to the resources of users belonging to their direct parent groups and their subgroups. This is typically granted to Group Administrators or Supervisors.
- All: allows users access to the resources of all users in the system. This type of policy is usually granted only to Administrators.
Example 1: Call center with Agents and Supervisors
In this example, call center agents shall be able to see their own recordings, supervisorA shall be able to see recordings for groupA and groupB, supervisorB shall be able to see recordings for groupB only. Here are the steps to configure this:
- Create one recordable user per recorded extension
- Create one non-recordable user per supervisor
- Create group A
- Create group B
- Add every agent user to either groupA or groupB (it is possible to add certain agents to both groups if wanted)
- Add supervisorA to groupA and groupB
- Add supervisorB to groupB only
- Add both supervisors to the Supervisors role
Example 2: Business hosted telephony provider
In this example, each end-customer is a company with several users and each company shall be mapped to a group. CompanyA shall be mapped to groupA, CompanyB shall be mapped to groupB. Within each company, one person shall be administering the system. Only this person might be able to access the live monitoring system. It shall not be possible for any company user to see data for another company, or even know that it exists. Here are the steps to configure this:
- Create one recordable user per recorded extension for both companies
- Create one non-recordable user per supervisor, e.g. supervisorA1 and supervisorA2 and supervisorB1
- Create one non-recordable user per company administrator, e.g. groupadminA and groupadminB
- Create regular groupA for companyA
- Create regular groupB for companyB
- Add every recordable user to either groupA or groupB
- Add supervisorA1, supervisorA2 and groupadminA to groupA
- Add supervisorB1 and groupadminB to groupB
- Add all supervisors to the Supervisors role
- Add groupadminA and groupadminB to the Group Administrators role
- Edit the access policies of the Supervisors and Users role in order to remove the live monitoring privilege altogether. The Group Administrators can access live monitoring by default, so no need to change access policies there.
Programs
Overview
In order to restrict what is recorded by Oreka, it is possible to create so-called recording programs from the Programs page. Those programs let OrkWebApps administrators specify recording schedules as well as filtering criteria. Any number of these programs may be created to achieve high complexity recording rules.
Very important note: when at least one audio or screen recording program is active, recordings become subject to Programs and are no longer retained by default.
A program is initiated by a trigger event, which causes a set of criteria to be evaluated. If the criteria are met, a corresponding action is taken. Hence, the Programs feature's usefulness is not limited to selective recording. The criteria-based functionalities allowed by programs are:
- Selective audio recording
- Selective audio and screen recording
- Selective screen recording (scheduled)
- Selective copying, moving, deleting or emailing of recordings (Media Manager)
The Copy, Move, Delete and Email recordings programs collectively define what we call the Media Manager feature.
Triggers
Triggers are events such as a pre-configured time or the completion of a recording. Scheduled (time-based) triggers may be one-time events or repeatable triggers that restart at a given frequency.
One-shot triggers are configured by setting the "Trigger first execution" field. Recurring triggers also set the "Trigger repeat period (in days)" field which establishes the frequency of the trigger.
Only Media Manager programs currently use those explicit triggers. Audio recording programs have implicit triggers based on the completion of the recording process.
Criteria
Criteria are conditions that are evaluated when the trigger event occurs. If met, they cause the program action to be executed. Examples of criteria are target user, target group, local party, remote party, ... The available criteria depend on the type of program in question. The "Handle as exclusion criteria" option ensures that the action is taken only if the criteria are NOT met.
The criteria list may vary between different programs. Also, local party, remote party, local entry point and tag text criteria may support regular expressions or simple wildcards CSV depending on whether they appear in scheduled or immediate programs. For example, in order to retain all recordings made to or received from phone numbers starting by the digit 5,6 or 7, enter "[5-7].*" in the remote party field of your program.
Be careful with the Target group criteria: it applies to the recording's user's parent groups as well as all their subgroups.
Scheduled Media Manager programs are bound in time by the two following criteria:
- Earliest timestamp: earliest timestamp is updated automatically by the software every time a new batch of recordings is processed. It sets the earliest recording that should be considered, and ensures that recordings previously evaluated don't get re-processed the next time the program is executed.
- Retention period (in days): this specifies the upper boundary of recordings (latest) that may be copied, moved or deleted. Recordings newer than that boundary are kept intact.
Actions
Actions are executed when the program is evaluated and the criteria are met. Actions may be one of the following:
- Keep an audio recording.
- Keep an audio/screen recording pair.
- Start/stop a screen recording.
- Copy recordings (Media Manager).
- Move recordings (Media Manager).
- Delete recordings (Media Manager).
- Email recordings (Media Manager).
Selective Recording (Audio and/or Screen)
Selective recording can be achieved with the Audio recording and Screen recording (scheduled) types of programs.
The basic Audio recording program will simply keep or discard a recording based on the defined criteria. The decision is made when the recording completes. Almost any recording metadata may be used as a program criteria including local party, remote party, call direction, duration, user associated to the recording, time of the recording, ... There is also a "recording percentage" criteria that ensures that only a certain random percentage of recordings is kept.
The Audio recording program may also be used to trigger screen recordings that are to be associated to the audio recordings with the "Trigger Screen Recording?" option. This option is only available when Screen Recording is licensed. In this scenario, when an audio recording starts, the program in question automatically triggers a screen recording. It also sends a message to the screen recorder to stop the recording when the audio recording completes, and associates it to the audio recording counterpart.
The other type of selective recording is Screen recording (scheduled) . This is for screen recordings only, and provides the ability to configure time-based trigger events for starting and stopping the screen recording (e.g. record only between 10AM and 2PM, or only on Thursdays, ...).
Media Manager (Copy, Move, Delete and Email)
The Media Manager (MM) functionality provides a mechanism to apply certain actions to existing recordings. These MM actions may be scheduled (time-based), or triggered when a recording completes. The latter is available for the copy and move programs, but not for the delete program. Deleting recordings as soon as they complete is rarely useful.
For copy and move programs, the actions are defined by the following parameters:
- Target service: this field must point to a File Server type service. It designates the target location where the media files are to be copied or moved and applies only to Copy and Move programs.
- Path name (string substitution): edit the secondary "Pathname" field if the target file's path is to be different from the original file's. Note that this refers only to the not the . The primary path refers to the "File absolute path" of the service in question, e.g. /var/log/orkaudio/audio , while the secondary path refers to the <TapePathNaming> path configured in the recorder's config.xml. The default being a date-based hierarchy e.g. 2009/11/12/09/20091110_154500_ABC.wav. You can heance use this field to customize your path name based on recording metadata. See for the list of string substitutions available for path naming in OrkWebApps.
- File name (string substitution): edit the "File name" field if you wish to customize the name of the target file. See File and Path Names in OrkWebApps for the list of string substitutions available for file naming in OrkWebApps.
Delete programs have the following action parameters:
- Delete files in file system: enable if actual media files need to be deleted.
- Delete entries in database: enable if deleting the recordings' metadata in the database is required.
Below are but a few examples of the many Media Manager uses:
- Configuring different delete retention periods for different groups.
- Moving recordings to different location depending on underlying customer (group).
- Backing up recordings for only a handful of groups.
- Renaming media files differently based on different criteria.
- Emailing media files immediately after they are written to the associated user.
- ...
File and Path Names in OrkWebApps
It is possible to configure the media files path and filename as a combination of the following dynamic parameters. Note that the pathname refers only to the secondary part of the pathname that typically defaults to year/month/day/hour/ .
- [orkuid]: the unique tape UID
- [segid]: the segment ID number
- [direction]: the direction, i.e. IN, OUT, UNKNOWN
- [shortdirection]: the short representation of the direction, i.e. I, O, U
- [localparty]: the local party field, typically containing a phone number or extension
- [remoteparty]: the remote party field, typically containing a phone number or extension
- [hostname]: the hostname obtained from the service associated to the recording
- [year]: the year in 4 digit format (e.g. 2009)
- [yy]: the year in 2 digit format (e.g. 09)
- [month]: the month, in 2 digit format (e.g. 02)
- [mm]: the month, in 2 digit format (e.g. 02)
- [day]: the day, in 2 digit format (e.g. 08)
- [dd]: the day, in 2 digit format (e.g. 08)
- [hour]: the hour, in 2 digit, 24 hour format (e.g. 18)
- [min]; the minutes, in 2 digit, (e.g. 06)
- [sec]: seconds, in 2 digit, (e.g. 06)
- [group]: the parent group of the user associated to the recording. NOTE: this assumes the user has only one parent group, otherwise the results are unpredictable.
- [grandparentgroup]: the grand parent group of the user associated to the recording. NOTE: this assumes the user has only one parent group, and one grandparent group, otherwise the results are unpredictable.
- [email]: email address of the user associated to the recording.
- [firstname]: first name of the user associated to the recording.
- [lastname]: last name of the user associated to the recording.
- [<tagname>]: a tag type associated to the recording (e.g. [nativecallid])
- [ucid]: UCID associated to the recording, if CTI is used and yields this metadata.
- [trunkgroup]: trunk group associated to the recording, if CTI is used and yields this metadata.
- [trunkmember]: trunk member associated to the recording, if CTI is used and yields this metadata.
- [nativecallid]: native call id associated to the recording, if CTI is used and yields this metadata.
Programs Priority
Since multiple programs may be defined, a legitimate question that often comes up is: what happens when a given recording meets the criteria of two or more programs? Which program(s) gets priority and which one(s) decides on the fate of the recording?
The answer is that it depends on the priority configuration. By default all deployments give priority to "negative" programs, i.e. to programs that would cause the rejection of a recording. Hence, even if many programs report that a recording should be kept, all it takes is for one program to reject the recording for it to be discarded.
This behavior may be reversed in the database configuration to ensure that one "positive" program guarantees that the recording gets kept.
All recording programs get evaluated for every new recording. When multiple programs agree that a recording should be kept, they all get associated to that recording.
Media Servers, Services and Media Access Modes
Media servers refer to the servers where media files are stored. These servers can be the recorder servers themselves or dedicated file storage servers. Media files are initially created and stored by the recorder on the recording server itself. However, they may be moved later on to another location by a Media Manager program. A common such example is when multiple recorders are set up and Media Manager programs are used to move media files to one central file storage server.
For more details on how to configure the orkaudio servers in a multi-server configuration, refer to the section described in Multiple Server Configuration (OrkAudio).
Media files are accessed in one of two ways:
- By a URL i.e. through http(s). This is typically used for playing back and exporting recordings.
- Through direct access on the local file system or by using ssh/sftp or AWS S3 API for remote servers. This is used for copying, moving or deleting files by the Media Manager.
Services play a key role in allowing the application access to the media files by the means above. The section below gives a full picture of their role and scope.
Services
Media Servers are represented in OrkWebApps by logical entities called services. Sevices may represent other types of servers such as SMTP servers for sending emails and Tracker servers representing OrkTrack processes.
In the context of media servers, services are used to link the recordings' metadata in the database to the corresponding media files: every recording's metadata has a reference to a specific service. When a recording is moved to another location described by another service, its service reference is modified accordingly to keep that association. Services also define the parameters needed to access the media files by URL, directly on the local disk, or by ssh/sftp or AWS S3 API for remote servers.
There are 5 types of services that can be defined:
- Audio
- Screen
- File Server
- SMTP Server
- Tracker
- WebUI
The first three refer to media servers. The Audio and Screen types describe typical recorder servers, while the File Server refers to servers dedicated to general media file storage only. Those three types inherit the same configurable attributes as shown below, while the SMTP, Tracker and WebUI services have different sets of parameters.
Services for recorders are created automatically by Oreka when the recorders are started. The recorders sign into OrkTrack and register themselves. These services may be later edited by the administrator, e.g. for configuring ssh/sftp access information and file absolute path.
File server type services are typically used with the Media Manager move and copy programs to designate a target location where to move or copy files. These target locations may be typical servers accessible by ssh/sftp, AWS S3 storage locations or a CallMiner Analytics platform accessible using the CallMiner Ingestion API (CM-API). Regardless of their nature, they always need to be created manually by the administrator.
Services Attributes
It is very important to verify that all services are properly configured to ensure correct functionality of many features in OrkWebApps such as playback, exporting, emailing, copying, moving and deleting media files.
All services have the following common parameters:
- Service ID: unique ID describing the service. It is defined internally by Oreka.
- Service name: arbitrary name of the service. Audio and screen recorders as well as Trackers automatically assign this field.
- Service type: audio recorder, screen recorder, file server, SMTP sever or tracker server.
- Description: text field for optional description of the service.
Media Servers
Parameters for access by URL (for playback and export):
- Host name: host name or IP address of the server.
- File serve protocol: protocol used to access files on the underlying server, typically "http".
- Application port: assigned by the recorders, typically 59140 for audio recorders, 59170 for screen recorders. This field is not required for file storage services.
- File serve port: port to access files on the server. Typically 8080.
- Context path: this field should match a corresponding entry in Tomcat's server.xml file on the server described by this service and is used to construct the URLs for accessing the media files. The defaults are "/audio" for the audio recorder and "/screen" for the screen recorder.
- File serve path: this field is appended to the context path parameter to provide more flexibility in URL construction.
- Streaming TCP port: indicates the port on which streaming will occur. Used mainly by OrkAudio for the Live Monitoring feature.
Parameters for direct access (for deleting, copying and moving files):
File absolute path: points to the exact directory or folder in the file system where the files reside. Examples are C:\Oreka\Audio in Windows and /var/log/orkaudio/audio in Linux.
Local: indicates whether the service resides on the same server as OrkWebApps (local), or on a remote server. For remote servers, the SFTP/SSH or AWS S3 parameters that follow are required for accessing files associated to this service.
File Transfer Protocol: for remote file servers, two protocols are supported: SFTP (ssh/sftp) and S3 for (AWS S3)
SFTP-specific parameters:
- SSH/SFTP user name: the user name to access the server using ssh/sftp.
- SSH/SFTP password: the password of the user name for accessing the server using ssh/sftp.
- SSH/SFTP port: the ssh/sftp port for accessing the server, typically 22.
S3-specific parameters:
- Access Key: the key to access the AWS S3 server.
- Secret Access Key: the secret key (or password) to access the AWS S3 server.
- Bucket: the AWS S3 bucket to copy/move files to/from
- Region: the AWS S3 region to copy/move files to/from. E.g "us-west-1"
Note
Always make sure to double-check the configuration of the following fields:
- Hostname: ensure that the service is accessible from the OrkWebApps server by the configured hostname. Often enough, the hostname is local and does not appear in the DNS causing the media files belonging to such a service to be inaccessible.
- File Absolute Path: it is essential to have this parameter configured for copy, move and delete to work properly. This parameter is empty by default.
- SFTP/SSH or AWS-S3 parameters: remote servers need to have their ssh/sftp or S3 parameters manually configured for copy, move and delete to work properly.
SMTP service
The email feature requires a service that describes an SMTP server. It will use that service to process the emailing of recordings. Below are the parameters needed to configure an SMTP service in OrkWebApps:
- Host name: host name or IP address of the SMTP server.
- Encryption Protocol: SMTPS (formerly SSL) or STARTTLS. It is recommended to use SMTPS.
- Protocol Version: allows setting of a specific Encryption Protocol such as "TLSv1.2 (optional).
- Port: the SMTP server port, e.g 465 or 587.
- Sender Email: the email of the sender that is to appear on the sent email. This is only needed if "Use Authentication" is disabled.
- Use Authentication: boolean true/false value for enabling/disabling authentication.
- User name: the user name of the SMTP account that will be used to send emails when "Use Authentication" is enabled.
- Password: the password of the SMTP account that will be used to send emails "Use Authentication".
Tracker service
The Tracker service is automatically created and added to the database the first time OrkTrack starts up. OrkTrack first adds an entry in the $ORKWEB_HOME/config.properties files called orktrackname, e.g. orktrackname=orktrack_58b7345667a3410e9866d371836fe8d4. Then, it checks if the database has a Tracker by that name. If not, it adds it to the database.
Warning
If you choose to change the Tracker name, make sure it is aligned with the orktrackname= in the $ORKWEB_HOME/config.properties files, otherwise you might end up with multiple Tracker services in OrkWebApps.
The Tracker service is mainly useful within the context of OrkTrack Clustering, but can also help internally for building URLs to OrkTrack services. The main attributes of Tracker services are:
- Host name: host name or IP address of the OrkTrack server.
- Clustered: boolean value that defaults to false. When enabled (set to true), it indicates that the OrkTrack in question would like to receive updates from peer OrkTracks.
- File serve protocol: protocol used to access OrkTrack, typically "http".
- File serve port: port to access the OrkTrack on the server. Typically 8080.
- Context path: this field must be set to "/orktrack"
WebUI service
The WebUI service needs to be created manually. Its main usefulness is to allow OrkTrack functionality to produces refenrences to the consumer application, typically OrkUI. For example, the Media Manager Copy and Move programs may send a metadata file along with the media file. This metadata file may include a URL providing access to the recording file in OrkUI. WIthout the WebUI service, OrkTrack would not know how to build such a URL.
Live Monitoring (On-Demand Recording)
OrkWebApps offer a Live Monitoring feature that allows you to see what calls are occurring at any given time. You can listen to these calls live and opt to record them or not (keep and discard options in the Live Monitoring page.)
In order to configure OrkWebApps for Live Monitoring, it is necessary to create users for all phone extensions you want to monitor and at least one group. All wanted users must then be added to the group(s). Please refer to Managing Users . Once done, the live monitoring page will list all groups for selection.
See also Live Monitoring for configuring OrkAudio
Note that by default, OrkAudio records all calls that appear in Live Monitoring, unless programs are defined and exclude such recordings. If you wish to operate in a purely on-demand recording fashion based on the Live keep/discard options, contact support@orecx.com for how to set up OrkAudio to default to a non-recording mode.
Quality Monitoring (QM)
The Quality Monitoring feature in Oreka allows managers or supervisors with proper privileges to evaluate calls by “scoring” or “marking” them based on a set of predefined criteria called Scorecards . The QM feature requires a separate license. A typical usage of QM scorecards is in call centers, where agent calls are often reviewed by their supervisors to ensure quality customer support and guide the agent to improve on weaker areas.
The guidelines or criteria are defined within scorecards. A scorecard may be associated to only one group in OrkWebApps. Groups may represent company departments or any other logical entity. They typically include one or several users.
The typical steps involved in setting up and using QM are the following:
- Creating scorecards
- Importing them into OrkWebApps
- Scoring calls based on those scorecards and saving the results
- Issuing statistics reports on scorecard results
We will explore each of those aspects in the sub-sections below.
Creating Scorecards
The first step in setting up QM is to create one or more scorecards. Scorecards establish the criteria that will be used to evaluate a recording. Scorecards may include one or more sections which in turn may host one or more questions. Each question may allow several answers with a different score associated to each. Sections and question scores may also be weighted differently.
Other scorecard features are:
- Auto-fail: some answers may be designed to automatically fail the scorecard results. This allows flexibility in giving great weight to some very important criteria.
- Exclusion: some answers may be designed to have no effect on the final score. For example, a not applicable (N/A) answer typically indicates that the corresponding question is moot, and should be omitted from the scorecard results calculation.
- Comments: there are multiple level of comments that can be added to a scorecard including the scorecard itself, its sections as well as the answers.
Creating a scorecard requires filling a CSV scorecard template file. Please refer to How do I configure a scorecard for QM? for more details on the format of the scorecard CSV file.
If a scorecard needs to apply to more than one group, one of two approaches may be used:
- Create two separate identical scorecards, one for each group, with a slightly different name, and associate them separately to each group,
- Create a parent group and make both groups in question its member or children groups, then associate the scorecard to the parent group. The two subgroups will automatically inherit access to that scorecard from their common parent group.
Importing Scorecards
Once a scorecard is created and configured to be associated to a group, it may be imported in OrkWebApps in the Scorecards page. Errors in the scorecard are detected and reported by the import function, and will cause the entire scorecard to be rejected.
Scoring calls based on scorecards
To "score" a recording, click on the scorecard icon in the OrkWebApps "Browse" page or go to the recording details page and select the "Scorecards" tab. OrkWebApps looks for the group(s) associated to recording's user, and makes any scorecard template associated to that user's parent groups available for the evaluation. Once the call is “scored”, the scorecard results may be saved for later review as well as for generating QM statistical reports.
Generating QM reports
Reporting on QM is possible through several reports with the ability to define a slew of filters for greater flexibility. In fact, all search filters that are available in the Browse are applicable to the QM statistics reports below. Reports may be generated in 3 formats: PDF, HTML and CSV unless explicitly specified otherwise. Here is a summary of the types of reports available:
- Scorecard results report (PDF only)
- Group report: a summary report displaying the number of scored calls, minimum/average/maximum score for each group.
- Group Detailed report: a report detailing the number of scored calls, minimum/average/maximum score for each question in each scorecard grouped by groups.
- User report: a summary report displaying the number of scored calls, minimum/average/maximum score for each user.
- User Detailed report: a report detailing the minimum/average/maximum score for each question in each scorecard grouped by users.
- Scorer report: a report listing the score and summary info of every recording grouped by scorers.
Security
Oreka addresses security issues at many different levels. Below is a summary:
- Secure access to the recordings, i.e. access by simple URL can be prohibited in general and allowed only for valid users who are logged into OrkWebApps. See below for details.
- Encryption: : OrkAudio may be configured to encrypt files, and OrkWebApps configured to decrypted them for playback. Files would thus be played back only through OrkWebApps.
- Secure access to the application using SSL (https access).
- Authentication Rules for user login access such as locking a user after a given number of unsuccessful login attempts, and password rules for ensuring a minimum level of difficulty in passwords.
For more information, please contact support@orecx.com .
Securing access to your media files
Securing access to media files in Oreka ensures that only users legitimately logged in to OrkWebApps are allowed accessing the files. In addition to the Access Policies, the following configuration is needed at a system level:
For each server that is storing recordings, configure the web server (e.g. tomcat or httpd) to allow access to the files only from the server where OrkWebApps is installed. Direct URL access to the files from user client PCs will no longer be allowed.
For single-server deployments, modify tomcat's server.xml file as follows:
<Context path="/audio" docBase="/var/log/orkaudio/audio" >

    <Valve className="org.apache.catalina.valves.RemoteAddrValve" allow="127.0.0.1" deny=""/>

</Context>
<Context path="/screen" docBase="/var/log/orkaudio/screen" >

    <Valve className="org.apache.catalina.valves.RemoteAddrValve" allow="127.0.0.1" deny=""/>

</Context>
For multi-server deployments, modify every recorder's tomcat's server.xml as above, but change the "allow" field content to include the hostname or ip address of the server where OrkWebApps is running.
Securing access to the application (OrkWebApps) using TLS
Secure access to OrkUI uses TSL, and requires that the URL to the application rely on https instead of http. To configure this functionality, simply edit the web.xml file stored under $tomcat/webapps/orkui/WEB-INF , and modify the line:
<transport-guarantee>NONE</transport-guarantee>
to
<transport-guarantee>CONFIDENTIAL</transport-guarantee>
After this change, access to OrkUI becomes https://localhost:8443/orkui . If you continue using http://localhost:8080/orkui , you will be automatically re-directed to the new https URL.
Note: the change above assumes that Tomcat was installed by the OrecX OrkWebApps installer. The installer performs some customizations to the Tomcat server.xml file to make the functionality above accessible. Contact support@orecx.com if your server.xml file does not contain these customizations.
Foreign Language Support
Oreka's architecture was designed with foreign language support in mind. It is thus very modular and requires minimal effort - translation of a couple of files - to integrate a new language.
OrkUI Language Support
The main OrkUI localization files are available in the $tomcat/webapps/orkui/assets/i18n folder.
- English : en_new.json
- French : fr_new.json
- Italian : it_new.json
Reports language files are stored in the $tomcat/webapps/orktrack/reports/i18n folder and have the following naming format i18n_en.properties.
For other languages, please contact support@orecx.com.
Warning
If these files are modified in production, the changes will be lost upon later upgrade of OrkWebApps. Instead, report any required changes to support@orecx.com.
Changing your Browser's Language
The selection of the OrkWebApps language usually occurs automatically by default, and depends on your Operating System language. For example, if you are running the French version of Windows, OrkWebApps will appear in French by default.
If you would like to change the displayed language, you would have to use the Language Options of your Browser.
Migrating OrkWebApps to Another Server
To move OrkWebApps functionality to a different server with the same operating system follow the procedure below.
Very important: make sure you are operating out of production hours.
On the old server:
- Stop the Tomcat service
- Backup the database, e.g.: mysqldump -u root -p oreka > orekaDB.sql . Note that the default database name is "test" with older OrkWebApps Windows versions and "oreka" for all OrkWebApps Linux versions as well as newer OrkWebApps Windows versions
- Save the OrkWebApps and Tomcat configuration files, as well as the license file: database.hbm.xml, logging.properties, localpartyMap.csv, orkl.txt and any other file in the OrkWebApps installation folder, as well as server.xml in the tomcat configuration folder ($tomcat/conf/.)
On the new server:
- Install and start the MySQL service.
- Create the MySQL database on the new server (e.g. "create database oreka;"). It is very important that the database name created here and imported in a later step below is the same as the one configured in the database.hbm.xml file from the old server. If the old database is called "test", this would be a good opportunity to rename it to "oreka" in the database.hbm.xml file and in this step.
- Install OrkWebApps (refer to ).
- Restore the OrkWebApps and Tomcat configuration files saved from the old server. Double-check that the database name in the database.hbm.xml file matches the one created above.
- Make sure MySQL and Tomcat are both services that restart automatically after reboot.
- Restore the database from the old server, e.g.: mysql -u root -p oreka < orekaDB.sql. Again, the name of the database specified MUST match the one in the database.hbm.xml file.
- Start the Tomcat service.
- Important: Make sure that at this point that you can browse the older recordings before applying new traffic to the server If not the case, verify that your database name is correct and that the new database actually contains the same records as the old database.
If you are uncertain about any aspect of the migration process, contact support@orecx.com.
OrkTrack Clustering
Overview
OrkWebApps Clustering allows multiple OrkWebApps to synchronize their caches and real-time(live) data which enables them to operate in a HA (High Availability) environment, or in a Load Balancing configuration. OrkWebApps Clustering assumes that there is a shared underlying database for persistence.This can be one physical database or a replicated database setup. The actual clustering occurs between the OrkTrack component of OrkWebApps as shown in the Figure A below.
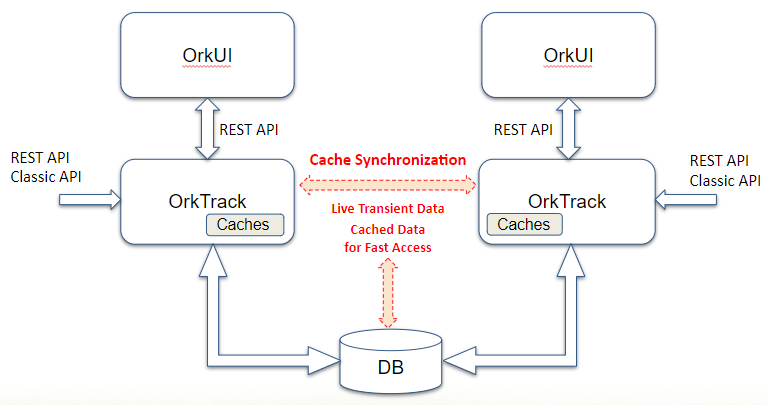
Figure A
Clustering accomplishes two main end goals:
- Ensures that any provisioning of resources that need to be cached for faster access is propagated to peers. This includes provisioning of users, groups, programs and services.
- Ensures that any real-time (live) data, such as metadata about live recordings are propagated to peers. This includes all recording start and stop messages, keep, discard and tagging live functionalities.
High Availability (HA)
OrkWebApps Clustering for HA helps provide redundancy and eliminates single-point-of-failure scenarios. In a HA environment, only one OrkWebApps is operational at any one point in time. All messages from all processes as well all user sessions are directed to the active node. See Figure B below.
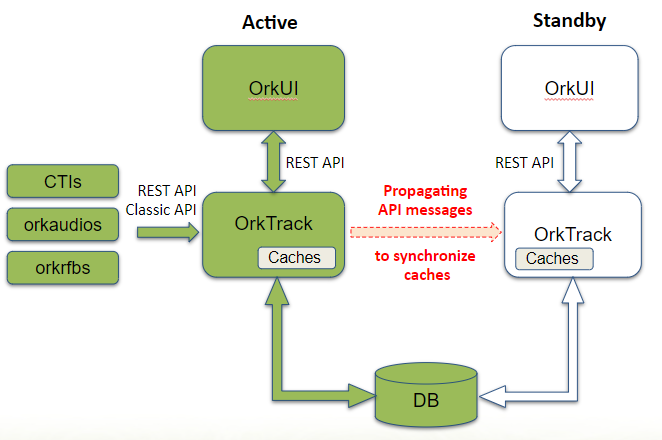
Figure B
The system may be manually switched over, or configured to automatically switch over in case of failure (using tools external to OrkWebApps). When this occurs, the roles of the nodes are swapped, and all traffic is redirected to the second node. As shown in Figure C below, after a switch over, the nodes swap roles, the Standby node becoming Active while the Active goes into Standby mode. Synchronization also changes direction.

Figure C
Load Balancing
In a load balancing setup, all nodes are active and continuously share their state. Hence, all nodes are responsible for forwarding their API inputs to their peers. In such a setup, user sessions can target any OrkUI as long as the session always communicates with that OrkUI (sticky session). Different recorders may target different OrkTracks
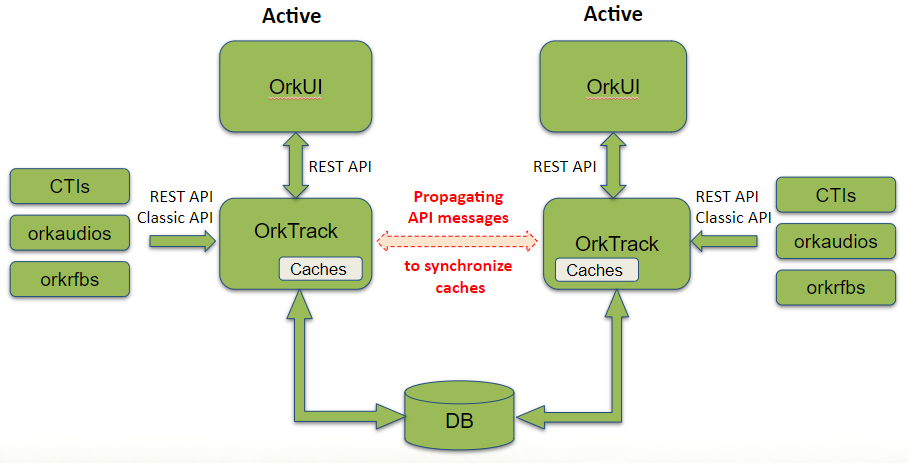
Figure D
Configuration
Tracker Service
Each instance of OrkTrack now appears as a new Tracker service in the Services page. This is done automatically the first time OrkTrack starts. The service is assigned a random unique name. See figure below.
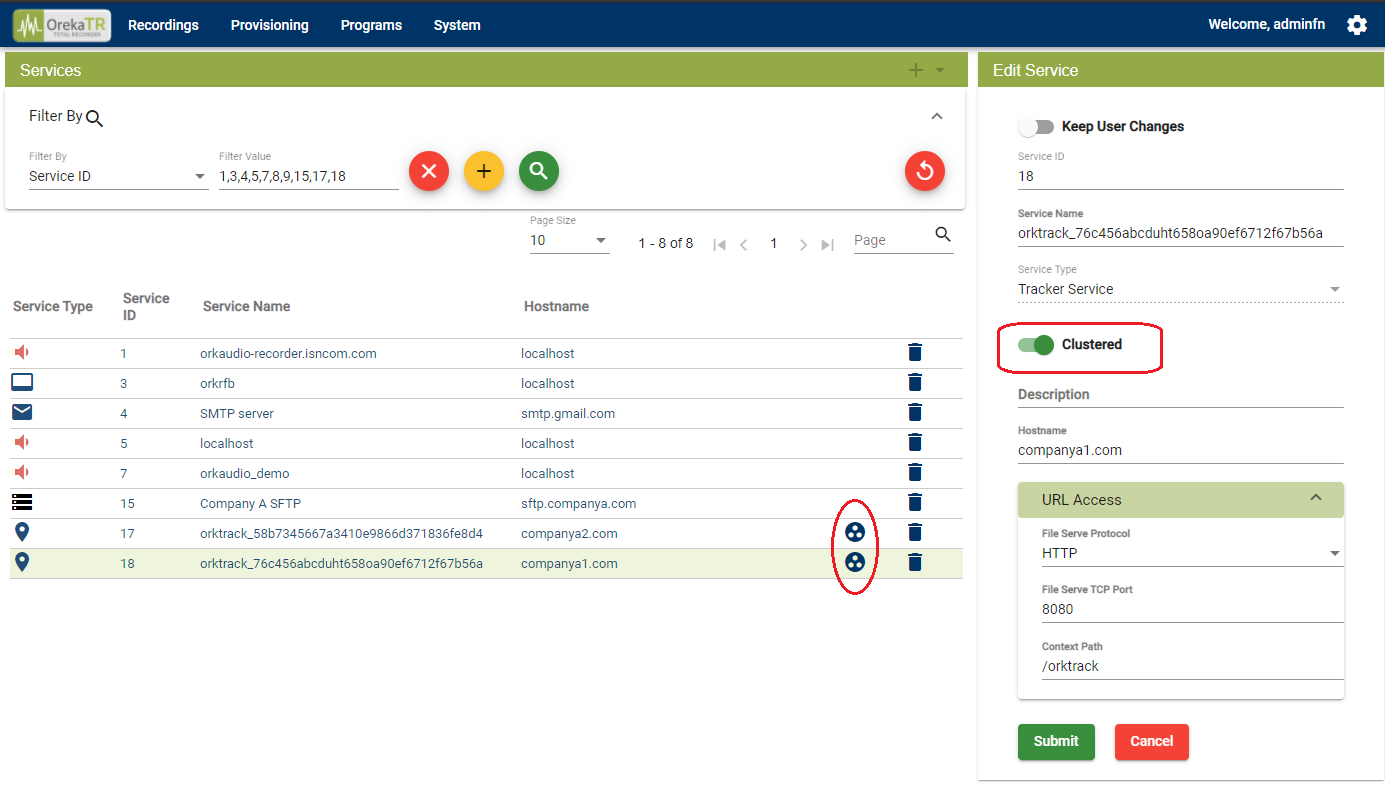
Figure E
The service name for the Trackers is generated automatically at startup, and stored in the {ORKWEB_HOME}/config.properties file under orktrackname=<name>. It is then picked up and stored in the database as a new Service if it does not exist already
If there is a need to change that name, it MUST be done first in config.properties then in the Services page without restarting Tomcat in between, to avoid creating a duplicate Tracker service. Clustering is not limited to two nodes. Several OrkTrack nodes may be deployed for a given system which is particularly useful for Load Balancing.
Enabling Clustering
When a Tracker Service (OrkTrack) has its “Clustered” setting enabled such as in Figure E above, it signals to all its peers that it would like to receive synchronization messages from them. This allows it to ensure that its real-time data and caches are up-to-date. Its cached users, groups services and programs will hence always be up-to-date to handle real-time calls and so will its Live Monitoring feature.
Scheduled Programs
In a Clustered environment, it is very important to ensure that Scheduled Programs do not run simultaneously and cause processing collisions. For the moment, this requires assigning this responsibility to only one clustered node.
run_scheduled_programs=true
while all other nodes must have the following:
run_scheduled_programs=false
Note that for backwards compatibility, if this setting is not specified, the scheduled programs will run. This setting must be put in place before starting OrkTrack.
Current Limitations
- Scheduled Programs must be configured to run on only one system at a time to avoid collisions.
- Synchronization of OrkTracks only occurs in real-time, not at start-up for the moment. This means that if an OrkTrack instance is started while another one already has calls in progress, those calls will not reflect in the newly started OrkTrack’s live page. Only new calls from that moment on will be propagated. Caches however will be up-to-date as they are loaded from the database at startup.
- Each OrkAudio recorder must be dedicated to only one tracker (OrkTrack).
- Only one OrkTrack may run on a given server.
- For load balancing setups, sticky user sessions are required to ensure that all traffic for a given user is always sent to the same clustered node.
Pre-requisites
Requires OrkWebApps version 2.87-11040 or later.
Branding
Branding provides the ability to customize OrkWebApps, changing its look and feel, its images files such as company and product logos, as well as its name for URL access, essentially white labelling it for custom purposes. Below are details on the available customizations and their configuration.
OrkUI Branding
OrkUI provides the ability to customize the following attributes:
- The product URL
- The two main background colours.
- The corresponding text colours.
- The brand logo
- The company logo
- The favicon image (little icon that appears on the Browser tab)
- The product title
- The About Dialog labels:
- The "About OrkUI" header
- The OrkUI build label
- The OrkTrack build label
- The Copyright product label.
Note
Unlike the old OrkWeb customizations, OrkUI branding survives across upgrades - except for the application renaming which requires a minor change at every upgrade - and changes will take effect in real-time without a need to restart Tomcat.
Configuring Customizations
The OrkUI configuration is located in the $ORKWEB_HOME/orkui folder, which is typically /etc/orkwebapps/orkui (Linux) or C:/Program Files/OrkWebApps/orkui (Windows). This folder contains the OrkUI configuration file app.config.json.
The recent OrkWebApps installers will configure a context path /assets/ in Tomcat's server.xml as <orkweb_home>/orkui/. This is the context path needed for OrkUI to access that configuration file as well as other customized assets such as the logo, product and favicon files. In the absence of any of these, OrkUI will fall back on its own internal default settings.
Below is the default JSON configuration file that resides in the application, as well as a branded version of it that may be stored in $ORKWEB_HOME/orkui that will survive across upgrades. Note that for the image files, the path starts with a /assets to point to the context path configured in the Tomcat server.xml file:
| Default Configuration File | Custom Configuration File |
|---|---|
{
  ...
  "brandingOptions": {
    "appTitle": "",
    "images": {
      "productLogo": "assets/images/brand-logo.png",
      "companyLogo": "assets/images/company-logo.jpg",
      "faviconLogo": "favicon.ico"
    },
    "about": {
      "header": "OrkUI",
      "uiLabel": "OrkUI",
      "restLabel":"OrkTrack",
      "copyright": "© 2018 OrecX."
    },
    "color": {
      "primaryColor": "#003366",
      "secondaryColor": "#93AA47",
      "primaryTextColor": "white",
      "secondaryTextColor": "white"
    }
  }
}
|
{
  ...
  "brandingOptions": {
    "appTitle": "",
    "images": {
      "productLogo": "/assets/abc-logo.png",
      "companyLogo": "/assets/abc-logo.jpg",
      "faviconLogo": "/assets/abc.ico"
    },
    "about": {
      "header": "ABC",
      "uiLabel": "ABC",
      "restLabel":"ABC-BE",
      "copyright": "©2021 ABC."
    },
    "color": {
      "primaryColor": "#FF5003",
      "secondaryColor": "#93AA47",
      "primaryTextColor": "white",
      "secondaryTextColor": "white"
    }
  }
}
|
This table details the configuration file attributes and their meanings. Each property is optional, and if removed from the file will be set to its Default Value.
| Property | Description | Default Value |
|---|---|---|
| appTitle | The text in the browser tab | OrkUI |
| productLogo | The image on the main menu bar and toolbar of the login page. | assets/images/brand-logo.png |
| companyLogo | The image on the login page. | assets/images/company-logo.jpg |
| faviconLogo | The favicon image. | favicon.ico |
| header | The About Dialog header label. | OrkUI |
| uiLabel | The About Dialog UI build label. | OrkUI |
| restLabel | The About Dialog Server build label. | OrkTrack |
| copyright | The About Dialog copyright label. | © 2018 OrecX. |
| primaryColor | The background colour of the main menu bar. | #003366 |
| secondaryColor | The background of the secondary headers. | #93AA47 |
| primaryTextColor | The text colour of the main menu bar. | white |
| secondaryTextColor | The text color of the secondary headers. | white |
Branding the Application Name (URL)
To change the OrkUI URL from https://locahost:8443/orkui to https://locahost:8443/MyRecorder the following needs to be done:
Back up the $Tomcat/webapps/orkui.war file. Make sure that the backup is NOT stored under $Tomcat/webapps/.
Edit the index.html inside the $Tomcat/webapps/orkui.war file, and change the following line:
<base href="/orkui/">
to
<base href="/MyRecorder/">
Rename the $Tomcat/webapps/orkui.war file to $Tomcat/webapps/MyRecorder.war. If Tomcat is already running, this should automatically undeploy the orkui/ folder and deploy a new myrecorder/ folder. Otherwise, simply restart Tomcat.
The OrkUI json configuration file in /etc/orkwebapps/orkui (C:/Program Files/OrkWebApps/orkui on Windows) should be MyCompany.config.json. If not present, OrkUI will use the default one instead.
Note
Multiple different brandings of OrkUI may co-exist on the same server with different context names, customizations, logos, ... To do so, deploy multiple versions of orkui under $tomcat/webapps/ with different names, and create one configuration file for each in the /etc/orkwebapps/orkui folder.
Warning
Application name branding does not survive across upgrades. It will need to be reconfigured any time a new version of OrkWebApps is deployed.
Branding the Application Reports
Application reports display the company logo in the top right corner. This logo can be branded by simply replacing the $tomcat/webapps/orktrack/images/company-logo.jpg file with a different one keeping the same file name.
Warning
Reports logo branding does not survive across upgrades. It will need to be replaced after every OrkWebApps upgrade.
Accessing OrkUI without specifying a port number
To access OrkUI without specifying a port number in the URL, such as https://servername/orkui instead of the typical https://servername:8443/orkui, you will need to either replace the Connector entry in Tomcat's server.xml configuration file for port 8443 with port 443, or simply copy and paste that connector to a new one for port 443, the default Tomcat secure port (for the unsecure port, replace 8080 with 80). If there are any other references in that file to port 8443, they also need to be modified (or duplicated) to use port 443 instead.
Configuration
OrkUI Configuration
The OrkUI configuration file is located in the $ORKWEB_HOME/orkui folder, which is typically /etc/orkwebapps/orkui (Linux) or C:/Program Files/OrkWebApps/orkui (Windows). This folder contains the OrkUI configuration file app.config.json.
The recent OrkWebApps installers will configure a context path /assets/ in Tomcat's server.xml as <orkweb_home>/orkui/. This is the context path needed for OrkUI to access that configuration file as well as other customized assets such as the logo, product and favicon files. In the absence of any of these, OrkUI will fall back on its own internal default settings.
The file is a JSON file, with the following configuration sections:
{
  "serverHostname": null,
  "serverPort": null,
  "configOptions": {
    "SAML": {
      "samlLoginUrl": ""
    },
    "formats": {
      "dateFormat": "MM-DD-YYYY",
      "timeFormat": "hh:mm:ss a",
      "dateTimeFormat": "MM-dd-yyyy hh:mm:ss a",
      "durationFormat": "HH:mm:ss"
    },
   "defaults": {
      "initialPageSize": 20,
      "pageSizeOptions": [10,20,50,100]
    },
    "password": {
      "passwordRecovery": true
    }
    "orkMPx": {
      "quickRewindSec": 10,
      "quickAdvanceSec": 30

    },
    "evaluations": {
      "legacy": false
    }
...
  },
  "brandingOptions": {
   ...
  }
}
The configuration fields are described below.
- serverHostname
- This field specifies the domain name of the OrkTrack server. If left null, it assumed that OrkTrack is deployed on the same server.
- serverPort
- This field specifies the port to use for the OrkTrack server. If left null, it will use the same port used for OrkUI.
- samlLoginUrl
- This field is used with Single Sign-On applications such as SAML. When present, all access to OrkUI URLs without an access token will redirect to the samlLoginUrl URL.See SAML SSO for additional information.
Formats
- dateFormat
- This field allows for the configuration of all single "Date" fields such as the Date column on the browse page.The default is YYYY-MM-DD
- DD is case insensitive, representing the Day of the month
- YYYY is case insensitive, representing the year
- MM must be upper case, representing the Month
- timeFormat
- This field allows for the configuration of all single "Time" fields such as the Time column on the browse page. The default is HH:mm:ss
- HH is 24 hours
- hh is 12 hours and is usually combined with a following "a"
- mm must be lower case, representing the minutes.
- ss must be lower case, representing the seconds.
- a must be lower case, representing {{{AM or PM }}}
- dateTimeFormat
- This field allows for the configuration of all other date/time fields including the date picker for Start Date / End Date in the filters.The default is YYYY-MM-DD HH:mm:ss
The fields use the same formatting as dateFormat and timeFormat.
- durationFormat
- This field allows for the configuration of the duration column on the browse page. The default is "" which represents seconds.An alternative setting would be HH:mm:ss.
Page Configuration
| Page | key |
|---|---|
| Browse Recordings | recordings |
| Evaluations | evaluations |
| Live | live |
| Users | users |
| Groups | groups |
| Roles | roles |
| Tag Types | tagtypes |
| Workstations | workstations |
| Scorecards | scorecards |
| Programs | programs |
| Audit Trail | audittrail |
| Services | services |
| User Sessions | usersessions |
For example the Browse Recordings page will be:
"recordings": {
  "initialPageSize": 15,
  "pageSizeOptions": [10,15,20,50,100]
},
The initial results per page (Page Size) and Page Size options are configured with the following parameters.
- initialPageSize
- The default page size.
- pageSizeOptions
- An Array of page size options that will be available in the "Page Size" drop down list.
Note
Password Recovery
Password recovery is an optional configuration parameter, that must be enabled in OrkUI and in the REST API.
To enable the Forgot Password option in OrkUI, add the following configuration parameters to the OrkUI Configuration file.
"password": {
  "passwordRecovery": true
}
Warning
The Password Recovery feature must also be enabled for REST API by setting orkconfiguration.passwordRecovery to true in the database.
OrkMPx Player
The OrkMPx Player is used to play audio and screen recordings. To configure the Quick Advance and Quick Rewind to values other than the defaults, you may use the following two configuration options. Values are in seconds.
"orkMPx": {
  "quickRewindSec": 10,
  "quickAdvanceSec": 30
}
Evaluations
The Evaluation page uses radio buttons to display the optional answers to each question.
Some customers prefer to continue to use drop down menus for these options, this can now be accomplished with the legacy configuration option.
"evaluations": {
  "legacy": true
}
API
REST API
As of version 2.10-5556, Oreka provides a new REST API. The documentation is available at http://files.orecx.com/api/oreka-restapi.pdf. Please contact OrecX at support@orecx.com for access credentials.
Legacy API
An older HTTP-based API may also be used for some complementary functionalities and is accessible at http://files.orecx.com/api/oreka-api-document.html. Please contact OrecX at at support@orecx.com for access credentials.
FAQ
How do I manually install orkaudio?
This is not the recommended installation procedure.
Orkaudio comes in two different packagings under Linux : automatic installer (.sh file extension) and RPM archive (.tar file extension). The automatic installer is the recommended way of installing the software. It comes as a single file named e.g. orkaudio-1.2-6560-x1459-i386.centos5-installer.sh . To install it, refer to On Linux
While the automatic installer works well on CentOS and RHEL, it may sometimes fail. If you run into errors with it, you can always proceed to a manual installation by extracting the .rpm files from it, and installing them manually. The procedure is described below.
To extract the .rpm files, run the installer. At the first question, exit by pressing CTRL-C. This will create a subdirectory under /tmp with all the required rpm files. You can then proceed as follows:
- yum install boost-devel
- yum install libpcap
- rpm -i xercesc-2.7.0-1.i386.rpm
- rpm -i ace-5.5.8-1.centos5.i386.rpm
- rpm -i log4cxx-0.9.7-1.i386.rpm
- rpm -i libsndfile-1.0.13-1.i386.rpm
- rpm -i orkbasecxx-1.2-660.i386.centos5.rpm
- rpm -i intel-ipp_rti-5.0p.x32.rpm
- rpm -i orkaudio-1.2-660.i386.centos5.rpm
- rpm -i --nodeps orkaudio-addons-1.2-1459.i386.centos5.rpm
Copy the orkaudio-startup-script to the /etc/init.d directory as orkaudio. This will allow you to start and stop orkaudio either using service orkaudio stop and service orkaudio start or /etc/init.d/orkaudio start and /etc/init.d/orkaudio stop
How do I backup Oreka?
This section is intended as a guideline for backing up your Oreka server. It lists all the entities or components that are involved.
Media files: the recordings are your main data. They are stored under the <AudioOutputPath> folder as configured in the recorder's config.xml file.
Database: contains the metadata about the media files. For mysql, you can back up using
mysqldump -root -p<password> <database_name> > orekadb.sql
where database_name is the name of the database, usually "oreka" in Linux, and "test" in Windows.
Configuration files: both OrkAudio's and OrkWebApps's. Refer to Configuration Files and OrkWebApps Configuration files for the files' locations.
Log files (if necessary): both OrkAudio's and OrkWebApps's. Refer to Log Files and OrkWebApps Log files
Customizations (if necessary): if you have made any customizations, make sure to back them up. These may include Tomcat configuration changes, web interface-related tweaks, etc.
Oreka software: ensure that you have a copy of the Oreka software or access to the website where the Oreka software was made available to you.
How do I configure Microsoft SQL Server (MS-SQL)?
MS-SQL Driver
For versions of Microsoft SQL server 2012 and above, ensure that the correct driver file (mssql-jdbc-6.4.0.jre7.jar.jar) is present in the $tomcat/shared/lib folder. If not, download it from Microsoft's web site and store it there. Remove any older driver such as sqljdbc4.jar from that folder. This is the driver required for older MS-SQL versions.
MS-SQL configuration
- For MS-SQL 2012 and above, here is a sample MS-SQL configuration file: database-mssql-example-2012.hbm.xml. For older versions, check out this example: database-mssql-example.hbm.xml.
- Modify the url, username and password as needed.
- Move the file to the OrkWebApps installation folder (typically C:\Program Files\OrkWebApps ) as database.hbm.xml , replacing the existing file.
- Start (or re-start) the Tomcat service, and verify in the orkwebapps.log file that all started normally.
Important notes:
- When using a database created manually as opposed to by the first start of the OrkWebApps application, it is necessary to apply the database indexes manually, to avoid performance issues down the line. Download create_indexes.sql and execute it as recommended in the header of the file.
- In the database-mssql-example.hbm.xml file, the recommended hibernate dialect to be used is com.orecx.oreka.dialect.OrkSQLServer2012Dialect.
How do I configure a scorecard for QM?
Scorecards are often first written in spreadsheet files. Therefore a CSV format is the most natural extension for importing scorecards into OrkWebApps This means that a spreadsheet file may simply be saved in a CSV format and imported as is into OrkWebApps, as long as it follows the guidelines and example below. Note that until OrkWebApps version 2.11-6288, the key/value Group,name were used instead of GroupID,ID. It was modified to remove ambiguity around duplicate group names.
Scorecard CSV File Format
- A line starting with the # symbol is considered to be a comment.
- A non-comment line must contain comma-separated fields. The number of
fields depends on the type of entry. There are 4 types of entries,
distinguishable based on the first field:
- Scorecard, name, comments
- GroupID, ID
- Section, name, weight, comments
- Question, name, weight, comments
- Answer, description, value, excluded, autofail, comments
- Fields that are empty may be left blank. If one or more fields at the end of the line are empty, they may be simply omitted. OrkWebApps will assign to them default values. Extra trailing fields that should not be there are simply ignored.
- Entries are hierarchical and at least one entry is required at each level, i.e. a scorecard that does not have separate sections must define a section anyway. The only entry that is optional is the Group. If not specified, the scorecard is not associated to any group (not recommended).
- A file may include multiple scorecards.
- About the fields:
- "id" is the oreka unique ID of the group the scorecard is to be associated with.
- "name", "description" and "comments" fields are of type String. The string fields must be surrounded by double-quotes, e.g. "Group Name", and should not include any double quotes, commas, etc within them (for now)
- "weight" fields are decimal values (stored as float). Default weight value: 1.0
- "value" field is a number (stored as integer).
- "excluded" and "autofail" are booleans, and take values: true or false, yes or no, 0 or 1. Defaults: false for both.
- The keywords (Group, Scorcard, Question, Answer) are case-insensitive. They are mandatory at the beginning of the line.
- name, description and value fields are mandatory. The rest are optional but must be represented (i.e. by a comma separator). See above for the default values for optional fields.
Scorecard CSV File Example
# Oreka sample scorecard CSV file: Scorecard_Generic_Example2_Sales.csv
# Below
is a summary description of the fields required:
#
#   Scorecard,name,comments
#   GroupID,id
#   Section,name,weight,comments
#
Question,name,weight,comments
#   Answer,text,value,excluded,autofail,comments
#
Scorecard,"Sales QA
Form",
GroupID,15
#
Section,"Opening Call",,""
Question,"Professional Greeting - Intro",,""
Answer,"No",0,,,
Answer,"Yes",1,false,false,""
#
Section,"Information
Verification / Data Collection",,""
Question,"Verify Zip Code",,
Answer,"No",0,,,
Answer,"Yes",1,,,
Question,"Collect
Name",1.0,""
Answer,"No",0,,,
Answer,"Yes",2,,,
Question,"Collect Phone Number",1.0,""
Answer,"No",0,,,
Answer,"Yes",2,,,
Question,"Verify
if Existing Customer and if Residence or Business",1.0,""
Answer,"No",0,,,
Answer,"Yes",2,,,
#
Section,"Establishing
Purpose of Call",1.0,""
Question,"Reason for Call",1.0,""
Answer,"No",0,,,
Answer,"Yes",1,,,
Question,"Lead
Source",1.0,""
Answer,"No",0,,,
Answer,"Yes",4,,,
#
...
Glossary
GSM 6.10 Codec
GSM 6.10 is an audio codec optimized for voice. It is the default storage codec for Oreka (wrapped into a wav file). It is used in the majority of the cellular networks worldwide and has a compression rate of 13 Kbit/s. When wrapped into a wav file it uses roughly 1.6 KByte of disk space per second of recorded audio. This means it's almost ten times more compact than MP3 format at standard compression rate. The advantage of this format is its ubiquity. It is possible to replay it in almost any existing Windows or Linux media player without installing any extra software or codec.
mcf file
Media Capture File format. It contains raw dumps of voice buffers in their original wire encoding. The file extension is ".mcf". This is an intermediate capture file format used before sessions are transcoded to their final storage format.
Primary pathname
The "primary" pathname for a media file is the one configured in the recorder's config.xml , for example in <AudioOutputPath> for OrkAudio.
Secondary pathname
The "secondary" pathname for a media file typically defaults to the YYYY/MM/DD/HH format and gets appended to the primary path. It may be configured separately in config.xml (e.g. <TapePathNaming> for OrkAudio).
Wildcard character
A wildcard character can be used to substitute for any other character or characters in a string. The asterisk character (*) substitutes for any zero or more characters. The question mark (?) substitutes for any one character.