Table of Contents
- 1. Introduction
- 2. Pre-requisites
- 3. OrkAudio
- 4. OrkWeb - OrkTrack
- 5. Appendix
- 6. Glossary
Table of Contents
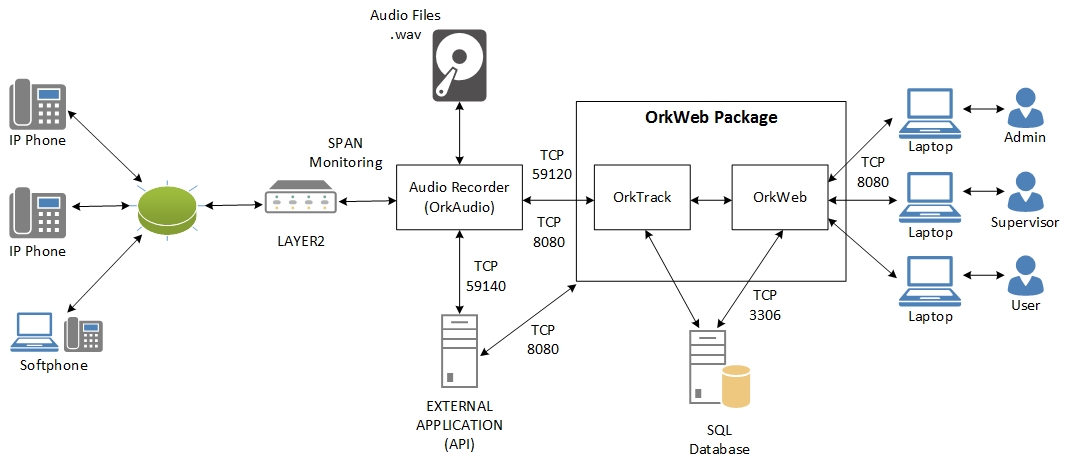
Oreka is a cross-platform system for recording and retrieval of audio streams. It supports VoIP, TDM and sound device based capture. It also includes features such as quality monitoring and screen recording. The Oreka user interface (OrkWeb) is web-based and provides features such as call live monitoring, recordings playback, extensive search and query capabilities, audit trail and many others.
The Oreka system consists of a combination of the following services
OrkAudio: this is the audio capture background service. It supports VoIP, TDM and Sound Device based recording.
OrkTrack: this service centrally tracks activity on the entire system and logs recordings to any popular SQL database.
OrkWeb: this service is the web interface accessible via any standard compliant web browser. It relies on the Tomcat web server.
OrkRfb: this is the screen capture background service. It relies on the RFB protocol used in VNC.
The system supports multiple instances of OrkAudio and OrkRfb reporting to OrkTrack so that multiple recording servers can be seen as one recording system. OrkTrack and OrkWeb are installed as one package. They may reside on the same server as the recorder or on a different server.
For the sake of simplicity, Oreka TR will be refered to simply as Oreka in the rest of this document.
Table of Contents
Test Server (PC or Laptop)
- Pentium IV, 1 GHz CPU
- 512 MB RAM
- 500 MB Hard Drive
Production Server
- Dual processor/Dual Core CPU, 2,6 GHz CPU (0-100 concurrent conversations, Dual Core CPU; 100-200 concurrent conversations, Quad Core CPU)
- 2 GB RAM
- 2 fast Hard Drives (SCSI 10K RPM), one for the OS, one for storing the recordings
Oreka TR runs on Linux and Windows platforms.
OrecX's preferred platform is Linux CentOS 32-bit. However, Oreka can be deployed on many other Linux flavors. Windows 32-bit versions are also supported. This includes Windows 2K, XP, 2K server, 2003 server, ...
For support of other operating systems, please inquire at
<support@orecx.com>.
MySQL is recommended as Orecx LLC's primary database environment. Oreka also supports most major database systems including IBM DB2, Oracle and PostgreSQL.
Before Oreka can start recording, ensure that VoIP traffic is seen on a server interface. Use SPAN port mirroring to get the right traffic to the Oreka server. Two configurations are possible:
- SPAN monitoring the entire VoIP VLAN so that all traffic to and from phones is intercepted;
- SPAN monitoring the PSTN Gateways and the Signalling server (e.g. SIP proxy, Cisco Call Manager, Avaya Communication Manager, ...)
This is to ensure that both the media traffic (RTP) and signalling (SIP, Skinny, H.323, UNISTIM, ...) are intercepted by the recorder. Use a packet analyzer such as the free Wireshark tool to verify that both types of packets are appearing on the Oreka server's interface.
Once the VoIP traffic appears on the server, you are ready to start using the Oreka software.
Mechanisms to get VoIP traffic
In terms of insertion point, Oreka can intercept packets via several mechanisms:
- Ethernet switch SPAN monitoring port: for Ethernet switches that have this capability. For Cisco, see http://www.cisco.com/en/US/products/hw/switches/ps708/products_tech_note09186a008015c612.shtml. This is the most popular solution.
- Ethernet tap: requires additional hardware, this option has become fairly cheap lately. See Netoptics Teeny Tap or Barracuda Ethernet Tap products for example.
- Being installed directly on the PBX or media gateway server. Not ideal.
- Old style Ethernet hub inserted in the Ethernet path, i.e. all traffic copied to all ports. Not recommended, do this only for testing or low traffic sites.
- Setup the machine as an Ethernet bridge inserted in the Ethernet path. Not recommended, do this only for testing.
Table of Contents
OrkAudio is the Oreka audio recorder component. It is a process that runs on Windows or Linux and records audio packets received on one of the server interfaces. It can record VoIP packets as well as TDM-based voice calls.
Here are the steps to install OrkAudio using installers on Linux, mainly CentOS and RedHat. Other Linux systems may require RPM files. Refer to the section called “Installing under RPM-based Linux Distributions” for more details.
Requirements
- You need to be logged in as "root" to install the Oreka software.
- You need an internet connection to download MySQL, Java and Tomcat.
Installation
- Use the installer file provided to you by OrecX, e.g.
orkaudio-1.2-660-x1459-i386.centos5-installer.sh.tar - Untar it:
tar -xvf orkaudio-1.2-660-x1459-i386.centos5-installer.sh.tar - Run the installer:
./orkaudio-1.2-660-x1459-i386.centos5-installer.sh(accept all required components)
Upgrade
Upgrading OrkAudio on Linux requires applying RPM files. The RPM archive comes
either as a single file named e.g. orkaudio-1.2-660-x1459-linux-i386-RPMs.tar,
or as 3 separate .rpm files. Assuming the former, here is the procedure to upgrade:
- Copy this file in a temporary folder on the target machine
- Untar the archive using
tar -xvf orkaudio-1.2-660-x1459-linux-i386-RPMs.tar. This should create 3 RPM files, orkaudio, orkaudio-addons and orkbasecxx. The version of these RPM files may differ from what is shown as an example below. To install the software, proceed as follows. - IMPORTANT: take a copy of
/etc/orkaudio/config.xmland/etc/orkaudio/logging.propertiessince the upgrade will delete them. - Stop the orkaudio service
# service orkaudio stop
- Upgrade the software
             # rpm -e orkaudio-addons
             # rpm -e orkaudio
             # rpm -e orkbasecxx
             # rpm -i orkbasecxx-1.2-660.i386.centos5.rpm
             # rpm -i orkaudio-1.2-660.i386.centos5.rpm
             # rpm -i --nodeps orkaudio-addons-1.2-1459.i386.centos5.rpm
- Restore the config files saved in a earlier step:
/etc/orkaudio/config.xmland/etc/orkaudio/logging.properties - Restart the orkaudio service
# service orkaudio start
Requirements
- You need to be logged in as Administrator before proceeding.
- Access to the internet is highly recommended for download of the Oreka software.
Installation
Use the installer file provided to you by OrecX,
e.g. orkaudio-1.2-657-x1463-win32-installer.zip.
Copy this file to a temporary folder on the target machine, unzip
it and run the embedded executable. This will install WinPcap as
well as OrkAudio.
When installing on multiple servers, the recorder (OrkAudio) runs on a different server than OrkWeb/OrkTrack. Thus, additional configuration is required. Here's a brief summary.
Communication with OrkTrack
The recorder needs to communicate to OrkTrack to report the recording metadata to be stored in the database. Thus, it needs to know where OrkTrack is running.
Make sure the <TrackerHostname> entry in the
OrkAudio config.xml is properly set to the OrkWeb/OrkTrack
hostname or IP address.
OrkWeb access to media files
For OrkWeb to be able to access the media files stored on the recorder's server, a web server application such as Apache httpd or Apache Tomcat needs to be installed and configured on the recorder's server. For a quick solution, use the OrkWeb installer and install only the Tomcat and Java Run-Time components. E.g., run ./orkweb-1.2-1435-linux-installer.sh --nomysql --nooreka on Linux. In Windows, you can stop the installer after Java and Tomcat are installed.
For more details, contact <support@orecx.com>.
For OrkAudio to run properly, a license file must be applied. This
file is provided to you by OrecX (e.g. orkaudio-30-days-trial-license-20090320.txt).
Store this file in the folder where OrkAudio was installed, typically
/etc/orkaudio on Linux and C:\Program Files\OrkAudio
on Windows. Make sure to rename it to license.txt.
Warning: under Windows, you need to make sure file extensions are shown (go to My Computer/Explore/Tools/Folder Options/View and uncheck "Hide extensions for known file types"). Otherwise you risk naming the file licence.txt.txt without realizing it.
Whenever a new license file is applied, the orkaudio service must be restarted for the change to take effect.
Audio output files are written to the c:\oreka\audio under Windows and in
/var/log/orkaudiounder Linux by default. This can be changed using the
<AudioOutputPath> configuration parameter described in the section called “Configuration”.
In typical installations, <AudioOutputPath> needs to be tuned according to the section called “Cannot replay recordings”
so that replay from the orkweb user interface is allowed.
Audio files are classified according to the following default scheme (see also TapeFileNaming and TapePathNaming in the section called “Configuration”):
yyyy/MM/dd/hh
Audio file themselves are named after the following scheme:
yyyyMMdd_hhmmss_capturePort.extension
OrkAudio configuration files are located in the install directory under
Windows and in /etc/oreka under Linux. The files are:
config.xml : this is the main OrkAudio configuration file. Plugins also read their configration parameters from subsections of this file. Please see the section called “Configuration” for more details.
logging.properties : this is the log4j logging configuration file which allows for great flexibility in logging scope and output format. Please see http://logging.apache.org/log4j/1.2/manual.html
Log files are located in the install directory under Windows and in
/var/log/oreka under Linux. By default, Oreka produces the
following output:
orkaudio.log : this is the main OrkAudio logfile.
tapelist.log : this logfile contains the details (metadata) for each recording that was performed by OrkAudio.
messages.log : : this log file contains a subset of details (metadata) for each recording that was performed by OrkAudio. Useful for re-creating database entries.
Plugins exist as dll files under Windows and as DSO (Dynamic
Shared Objects) with .so extensions under Linux. They are located in
{OrkAudioInstallDirectory}/audiocaptureplugins under
Windows and in /usr/lib under Linux.
VoIp.dll - libvoip.so : VoIP recording plugin for SIP, Cisco Skinny and pure RTP protocols.
H323voip.dll : VoIP recording plugin for H.323, Avaya, Nortel UNISTIM and MGCP protocols.
SoundDevice.dll - libsounddevice.so : Sound Card based recording
Generator.dll - libgenerator.so : Audio generator for faking audio capture (useful when testing)
Wire audio encodings are detected automatically by OrkAudio. Audio is not usually stored in its original wire format. Audio is recorded in real time to mcf files in order to maximize capturing performance and is later transcoded to the final storage format as specified in the section called “Storage audio formats”. The following encodings are supported:
- G.711 ulaw
- G.711 alaw
- GSM 6.10
- iLBC
- G.729A
- G.723.1
- G.722
The storage format is the file format used to archive recordings to disk. Mcf capture files are transcoded from the wire encoding to the final storage format on a best effort basis. All possible storage encodings are currently wrapped into the wav container format. This means that all generated audio files have a .wav file extension and easily play on any existing Windows or Linux media player. The following formats are supported, please see the section called “Configuration” for more details.
- GSM 6.10 wav: default format
- G.711 ulaw wav
- G.711 alaw wav
- PCM wav: uncompressed audio, not recommended.
Configuration of OrkAudio and its plugins is performed by modifying the config.xml file (see also the section called “Configuration Files”). Core OrkAudio configuring parameters are the following:
<AudioOutputPath>: this parameter controls the root directory where capture and storage audio files are stored. It can be a relative or absolute path.
<CapturePlugin>: this parameter controls which audio capture plugin should be used. Valid values are
VoIP.dllandlibh323voip.dllin Windows, andlibvoip.soandlibh323voip.sounder Linux.<TrackerHostname>: the hostname or IP address of the server where OrkTrack (a component installed with OrkWeb) resides. If you use the OrkTrack hostname instead of the IP address (recommended), make sure that DNS is set up correctly and that you can ping that hostname from this OrkAudio server.
<StorageAudioFormat>: this parameter controls the final file format of the tapes. Valid values are the following: gsm, ulaw, alaw and pcmwav. "gsm" is the default value and is the best compression rate available. All values generate wav files with various degrees of compression.
<TapeProcessors>: usually set to BatchProcessing, Reporting. Reporting ensures that the metadata about recordings is "reported" to the database through OrkTrack.
<DeleteNativeFile>: this parameter allows you to keep the uncompressed .mcf file even after the transcoding to the .wav is complete. The default is "yes". Set it to "no" to keep the .mcf file.
<TapeDurationMinimumSec>: minimum duration in seconds for a call to be recorded.
<AllowAutomaticRecording>: if set to "yes" (default setting), calls will be recorded by default. "no" indicates that only explicitly requested recording will occur (e.g. from Live Monitoring in OrkWeb).
<LookBackRecording>: if set to "yes" (default), will always record the call from the beginning regardless of when the request to start the recording was initiated, while a "no" setting will record only from the time the request was made.
<TapeFileNaming> and <TapePathNaming>: these parameters control the final transcoded file and path naming scheme. They contain a CSV list of elements. If an element matches a keyword, it will be replaced by the corresponding value. If an element does not match any keyword, it will be used verbatim in the file name. Example:
<TapeFileNaming>myrecordings-, nativecallid</TapeFileNaming>
with a native call ID of FDBCE@69.13.45.6 will result in the following file name:
myrecordings-FDBCE@69.13.45.6.wav. If this parameter is missing, the default naming scheme applies which is a timestamp plus the internal tracking ID. The list of possible keywords is detailed in the section called “File and Path Names”. When this parameter is set, the audio file output directory structure becomes flat, i.e. all files will be stored directly in the directory set by the AudioOutputPath configuration parameter instead of being distributed to the default year/month/day/hour folder tree structure described in the section called “Files Location”.
It is possible to configure the path to which audio files are written as well as the audio file names as a combination of the following dynamic parameters:
- [nativecallid]: this is the call ID extracted from the underlying protocol (SIP, Cisco Skinny, ...)
- [trackingid]: this is the internal Oreka tracking ID
- [direction]: in, out or unkn
- [shortdirection]: I, O or U
- [remoteparty]
- [localentrypoint]
- [localparty]
- [localip]
- [remoteip]
- [hostname]
- [year]
- [day]
- [month]
- [hour] in 24 hours format
- [min]
- [sec]
VoIP plugin specific configuration is found in the config.xml
file under the VoIpPlugin tag. Many options are available for this
plugin, such as limiting traffic, blocking traffic from/to a specific IP address, ...
The default config.xml has some of the main options listed in it
and commented out. Please consult that file or contact <support@orecx.com>
for more details.
As an example, it is possible to configure the network device to monitor for VoIP traffic using the <Devices> directive. While OrkAudio attempts to automatically select the server interface on which it detects VoIP traffic, you may in some cases need to configure the interface manually. E.g.
In Windows:
<Devices>\Device\NPF_{E0E496FA-DABF-47C1-97C2-DD914DFD3354}</Devices>In Linux:
<Devices>eth2</Devices>
Several comma-separated interfaces may be configured in the examples above
Make sure the OrkAudio license file is properly applied. Refer to the section called “Applying OrkAudio License File”.
Under Windows, start the OrkAudio service in Service Management (start/run/services.msc).
Under Linux, start the OrkAudio service by typing service orkaudio start on the command line.
You might need to double-check that the orkaudio service was started correctly.
In Linux, use the following command:
# ps -ef | grep orkaudio
A line showing that orkaudio is running must appear:
root 32071 1 0 10:02 ? 00:00:00 /usr/sbin/orkaudioIn Windows' Service Management tool (start/run/services.msc), ensure that the orkaudio service is started
During installation using the official installers, OrkAudio will install itself as an automatic service, i.e. a service that restarts automatically if the server is rebooted. This is important in the case of power failure, maintenance or other unpredictable events that may cause the system to fail or be restarted. Ensure that the service is configured properly as follows:
- In Windows' Service Management tool (start/run/services.msc), right click on the orkaudio service and ensure that the Startup type is set to Automatic
- In Linux, the command "chkconfig -- list orkaudio" should yield a response such as below:
# orkaudio 0:off 1:off 2:on 3:on 4:on 5:on 6:off
If not, chkconfig orkaudio on will need to be executed.
If no recordings appear in the <AudioOutputPath> directory, Here is the checklist:
- Windows users only: Make sure winpcap3.1 or above is properly installed (start/programs should contain a Winpcap entry)
- Make sure that the VoIP plugin records from the right network interface(s) specified in the <Devices> xml tag of the config.xml file. A list of all network interfaces is shown in orkaudio.log at startup.
- Make sure that RTP traffic is actually present on the specified network interface(s). A packet sniffer such as Ethereal can be useful for that.
- Refer to the section called “Getting VoIP traffic to the Oreka Server”
Recoded wav files should all be replayable by a media player such as Windows Media Player. Here is the checklist
- Make sure that a sound device is installed on your system.
- Make sure the file is not being processed by OrkAudio. Try again later.
- Make sure that if the RTP traffic is encoded as G.729A or G.723.1, you are properly licensed for those codecs. OrkAudio logs error messages at startup if there is a licensing problem.
Make sure that RTP traffic for both sides is actually seen on the considered network interface. A packet sniffer such as Ethereal can be used for that.
Use wireshark to see if signalling packets (e.g. SIP or Skinny) can be seen on your chosen sniffing NIC. Simply capture some traffic for 1 minute and type "sip" or "skinny" as a wireshark display filter in order to see only the relevant packets. If resultset is empty, it might mean that the packet interception strategy is missing some traffic, see the section called “Getting VoIP traffic to the Oreka Server”.
Table of Contents
OrkWeb and OrkTrack are two components of the Oreka package that are deployed and installed together and are often referred to simply as OrkWeb.
The actual OrkWeb component is the user interface that is accessible through any browser, while the OrkTrack component is mainly responsible for receiving metadata about recordings from OrkAudio and storing them in the database. See diagram below for a usage example.
OrkWeb/OrkTrack need the following software:
- The Java Runtime Environment JRE 6.0 from http://java.sun.com
- The Apache Tomcat servlet container version 5.X from http://tomcat.apache.org
- The MySQL server version 5.X from http://www.mysql.com
The OrkWeb installer can install Java JRE and Apache Tomcat, it has them as options. However, MySQL needs to be installed separately and prior to running the installer.
Here are the steps to install OrkWeb on Linux (mainly CentOS, RHEL, Fedora, OpenSuse).
For assitance with other Linux distributions, contact <support@orecx.com>.
- You need to be logged in as "root"
- You need an internet connection to download MySQL, Java and Tomcat.
As mentioned earlier, OrkWeb and OrkTrack require a database engine (preferably MySQL), Java and Tomcat. Java and Tomcat are downloaded and installed by the OrkWeb installer provided to you by OrecX. MySQL, on the other hand, needs to be downloaded and installed separately.
- If the database server (MySQL) is not already installed, install it:
e.g.
yum install mysql - If the MySQL service is not already running, start it:
e.g.
service mysqld start - Make sure that MySQL will restart automatically after a system reboot:
e.g.
chkconfig mysqld on - Untar the OrkWeb installer provided to you by OrecX:
e.g.
tar -xvf orkweb-1.2-1482-linux-installer.sh.tar - If the Apache Tomcat service is already installed and is running,
stop the service: e.g.
service tomcat stop - Run the installer:
./orkweb-1.2-1482-linux-installer.sh
The OrkWeb installer will prompt you for the MySQL "root" user password. By default, MySQL is installed with no default password. If you had set one, enter it here.
The installer will then prompt you for the installation of Java and Tomcat. Accept the default directories. It will then install OrkWeb and OrkTrack under Tomcat, and configure the Tomcat service to be automatically started after a reboot. However, it will not run the Tomcat service at the end of the installation. You will need to start it yourself after you apply the license file, as described in a later section.
- You need to be logged in as Administrator before proceeding.
- Access to the internet is highly recommended for download of the Oreka software, and MySQL.
As mentioned earlier, OrkWeb and OrkTrack require a database engine (preferably MySQL), Java and Tomcat. Java and Tomcat are downloaded and installed by the OrkWeb installer provided to you by OrecX. MySQL, on the other hand, needs to be downloaded and installed separately.
- Install MySQL: you can download the MySQL Windows Essentials for your platform at http://dev.mysql.com/downloads/mysql/5.1.html#win32. Install it accepting all the defaults. Take note of the "root" password if you assign one. It will be needed when you install OrkWeb.
- If Apache Tomcat service is already installed and is running, stop the service
- Install OrkWeb: unzip the OrkWeb installer provided to you by OrecX,
e.g. orkweb-1.2-1482-win32-installer.zip. - Run the embedded executable. This will first install Java, then Tomcat (accept all default options) and finally OrkWeb and OrkTrack.
- Make sure to enter the correct MySQL "root" password when installing OrkWeb.
You can always update it later in the database.hbm.xml file in the OrkWeb installation
folder,
C:\Program Files\OrkWebby default.
The installer configures the Tomcat service to be automatically started after a reboot. However, it will not run the Tomcat service at the end of the installation. You will need to start it yourself after you apply the license file, as described in a later section.
- Backup the database, e.g.:
mysqldump -uroot -p<password> oreka > orekaDB.sql - Download the OrkWeb installer, e.g. in Linux:
wget http://orecx.com/mycompany/orkweb-1.2-1482-linux-installer.sh.tar - Stop the Tomcat service, e.g. in Linux:
service tomcat stop - Untar or unzip OrkWeb the installer
- Install OrkWeb, e.g. in Linux:
./orkweb-1.2-1482-linux-installer.sh --nomysql --notomcat --nojava. In Windows, simply ignore the installation of Java and Tomcat. - Re-start the Tomcat, e.g. in Linux:
service tomcat start
To upgrade using .war files use the procedure below. The version of the .war file made available to you by OrecX may differ from the example below, but the procedure still applies.
- Get the orkweb.war and orktrack.war files. Sometimes libraries may be required too.
E.g.
orkweb-1.2-1500.war,orkweb-1.2-1500.warandlib.zip - Backup the database, e.g.:
mysqldump -uroot -p<password> oreka > orekaDB.sql - Stop the Tomcat service, e.g. in Linux:
service tomcat stop - Move the existing
$tomcat/webapps/orkweband$tomcat/webapps/orktrackfolders to a safe place somewhere else than under$tomcat/webapps, you will need them in a later step. - Copy the orkweb war file to
$tomcat5/webapps/orkweb.war - Copy the orktrack war file to
$tomcat5/webapps/orktrack.war - Restart the tomcat service. It should create new
orkwebandorktrackfolders under$tomcat5/webapps/ - Replace the new
web.xmlfiles in the$tomcat/orkweb/WEB-INFand$tomcat5/orktrack/WEB-INFfolders with the old ones saved in the ealier step above. - Restart the tomcat service
Save the OrkWeb license file, e.g. orkweb-30-days-trial-license-20090320.txt
sent to you by OrecX in the folder where OrkWeb was installed, typically /etc/orkweb
in Linux and C:\Program Files\OrkWeb on Windows. Make sure
to rename the file to orkl.txt.
Another way to apply the OrkWeb license is by copying its content and pasting it into the Input License box in OrkWeb, which is accessible from the login page the first time OrkWeb is accessed, or from the Account page at subsequent tries.
Note that there are two types of license files: trial and production. The trial type is sent to you by OrecX as a first license and allows you to record everything on the wire. It is good to start with this type of license to uncover any configuration tweaks that may be necessary.
For example, you may be seeing only the RTP streams but not the control packets, thus no phone number or extensions can be associated to calls. With a trial license, you will be able to quickly detect such a situation and correct it since all calls would be recorded and would appear in the OrkWeb Browse page with the local and remote party typically showing as IP addresses.
With a production license, users must be configured in OrkWeb with their phone numbers or extensions (or other) as a login string, for Oreka to be able to associate the local party in the VoIP packets with the configured user and thus recording the call. If no users have been configured in OrkWeb, a production license will inhibit all recording. See also the section called “Login Strings”
Before migrating to a production license, make sure all extensions, phone numbers, SIP URIs, ... that need to be recorded, are configured as login strings for defined users in OrkWeb. The login string field must match what you see in the local party field in the Browse page.
OrkWeb and OrkTrack have a set of configuration files that allow them to know
where and how to access the database, and what information to write to log files. The main
configuration files are shared between OrkWeb and OrkTrack and can be found under
/etc/orkweb in Linux, and typically under C:\Program Files\OrkWeb
in Windows. These folders contain 3 main files:
database.hbm.xml: for application database access information.logging.prorties: for application logging configuration.orkl.txt: the license file.
Both the OrkWeb-OrkTrack applications, and the Tomcat web server have their own logging mechanisms. Below are the files of interest for both cases:
orkweb.log: this file contains messages logged by OrkWeb and OrkTrack. the level of logging is defined in thelogging.propertiesfile. It can be found in/var/log/orkwebunder Linux and typically inC:\Program Files\OrkWebin Windows.catalina.out: this is the file where Apache Tomcat logs its own messages. It resides in the$tomcat/logs/folder.
By default, OrkWeb and OrkTrack use port 8080. Thus, ensure that port 8080 is open on the server. In Linux, you need to look at iptables, while in Windows, you can check your Firewall settings from the Control Panel.
Before starting OrkWeb and OrkTrack, ensure that the database server, typically MySQL, is running. Once done, start the Apache Tomcat service which will launch OrkWeb and OrkTrack.
You can use ps -ef | grep mysqld to verify if mysqld is running,
and service mysqld start to start it if it is not.
Once the MySQL is running, start the Apache Tomcat web server, e.g.
service tomcat start.
Open any standard web Browser and type the following URL: http://localhost:8080/orkweb. If you are accessing from a location other than the server on which Oreka was installed, replace localhost with the hostname or IP address of the Oreka server.
This will bring up a login screen as the one shown below. Login as admin/admin.
If this is the first time you attempt to login after the installation, you will be presented with a license input screen. Copy the content of the license text file issued to you by Orecx and paste it into the text box.

OrkWeb users are managed in the Admin/users page. It is possible to create, edit, disable and delete users. You can also configure users to be recordable or not. Non-recordable users are typically users who have administrative privileges, and do not count against the licensed user limit.
Your license key limits the number of active users you can have at any point in time. To free a few licenses, you can delete users or simply disable them. Being disabled, they will still be visible but no new recordings will be associated to them and those disabled users won't be able to log into OrkWeb.
There is one pre-defined and non-editable user in OrkWeb: "admin". This user has all the possible privileges or access policies enabled, and is reserved for the main admininstrator.
Each user can have multiple login strings entered as a cvs list of text strings. Those login strings serve two purposes:
- They act as unique identifiers for OrkWeb users.
- They specify what phone numbers or extensions are to be recorded.
When a new call occurs, if the local party field, as would be seen in the OrkWeb Browse page, matches one of the user's login strings, the recording will be associated to that user. The login string matching is case sensitive.
For example, Tom's login strings might be "tom, 5312". Any call to extension 5312 will be associated to Tom, and Tom will be able to log into OrkWeb using either "tom" or "5312" as an identifier (assuming Tom has a password defined. OrkWeb login is denied for users with blank passwords).
Configuration of users and login strings is very important for correct behavior when using production licenses. Refer to the section called “Trial versus Production license”
When you have a great number of users to define in OrkWeb, it could be a daunting task to create them all, one at a time, from the Admin/users page. In this case, you can use the Import Users feature available on that page. This feature allows you to import a comma-separate list of users directly into OrkWeb. Below are the fields that define the file format:
firstname, lastname, login string, password, recordable, force password change
Only the firstname and lastname fields are mandatory. The rest can be left blank if not required. Also, only one login string can be entered on one line. The "recordable" and "force password change" fields can be set to "false"/"true", "0"/"1" or "no"/"yes". The "force password change" field, if set, forces the corresponding user to change their password the next time they login. This is mainly useful when defining new users.
There are two other global settings that can be configured when importing users: "Keep old login strings" and "Recordable". "Keep old login strings" allows you to select whether a user in the csv list that already exists in OrkWeb should have their login string(s) replaced by the login string in the imported file, or whether the new login string is to be simply added to that user's existing login string(s).
In Oreka, Groups have two main purposes: allow a logical grouping of users for filtering and other functions, and provide priviliged, fine-grained access to the different features. The former is represented by a regular group, while the latter is what is referred to in Oreka as a Security Group.
Every user in Oreka must belong to a security group which determines the access privileges for that user. Newly created users are implicitely associated to the default "Users" security group. There are 4 pre-defined groups in OrkWeb. These groups have specific access policies, and cannot (and should not) be deleted:
- Users
- Administrators
- Group Administrators
- Supervisors
When you click on the "view" link next to a group in the Admin/groups page, a "Managed Access Policies" button appears. Clicking on it displays the Access Policies definition page. You can create your own secuity groups and give them the access policies that you wish.
Users or groups of users associated to a particular Security Group inherit that group's access policies.
In order to restrict what is recorded by Oreka, it is possible to create so-called recording programs from the Programs pane. Those programs let OrkWeb's administrator user specifiy recording schedules as well as filtering criteria. As soon as at least one program is created, Oreka starts retaining only those recordings that match at least one of the programs. It is possible to create any number of these programs to achieve high complexity recording rules.
Local and remote party program criteria support regular expressions (as opposed to wildcards). For example, in order to retain all recordings made to or received from phone numbers starting by the digit 5,6 or 7, enter "[5-7].*" in the remote party field of your program.
OrkWeb offers a Live Monitoring feature that allows you to see what calls are occurring at any given time. You can listen to these calls live and opt to record them or not (keep and discard options in the Live Monitoring page.)
Note that by default, OrkAudio records all calls that appear in
Live Monitoring, unless programs are defined and exclude such recordings.
If you wish to operate in a purely on-demand recording fashion based on
the Live keep/discard options, contact <support@orecx.com>> for
how to set up OrkAudio to default to a non-recording mode.
The Auto-Delete feature may be used to automatically delete files and their metadata in the database after a certain period of time as defined by the "retention period" parameter. When activated, it runs as a background task, at the frequency set by the "wake-up period" parameter.
Note that for now, this feature operates on all media files in the system. This applies even for setups with multiple recorders set up on different servers. Options to delete recordings based on specific criteria (e.g. service, program, ...) will be added in the future.
The Auto-Delete feature runs as a background task. When it wakes up, it searches in the database for all recordings that are older than the retention period. It then deletes recording files (e.g. .wav for audio and .fbs for screen recordings), in batches of one day, starting from the oldest.

Below are the instructions for how to configure Oreka to delete all media files in the system and their database info, if they are older than 180 days (approximately 6 months):
- Set "Delete files in filesystem" to Enabled
- Set "Delete entries in database" to Enabled
- Set "Wake-up period" to the frequency at which this task is to run. Typically, 1 day (86400 secs) is sufficient.
- Set "Date/time of first execution" as desired. This is mainly useful for postdating the start of execution of this feature.
- Set "Retention period" to the number of days recordings are to be kept in the system before being deleted.
The "Stop Auto-Delete" button provides a quick mean for turning off this feature. It resets the "Delete files in filesystem" and "Delete entries in database" to Disabled, and "Wake-up period" to 0.
For deletion of remote files, a ssh server needs to be running on the remote server. Also, the corresponding service must be configured with the ssh parameters in OrkWeb, in the Config/services page.
It is recommended to delete both files and database info with this feature. Deleting only database info leaves orphaned recordings that are neither easily accessible nor identifiable, while deleting files only and leaving the corresponding data in the database means that the Auto-Delete feature will unnecessarily re-attempt to remove already deleted files every time it wakes up.
The File Manager feature allows copying, moving and renaming media files after they are created by the recorder. Copying media files is also referred to as "archiving".
The File Manger may be used in different scenarios. Here are some examples:
- Multiple recorders are being used and all media files need to be centralized at one location;
- All recordings are to be copied (archived) to another location for backup.
For now, this feature operates on all media files that appear after this feature is activated. When active, i.e. the "Disable" checkbox is un-checked, every time a new recording occurs, a corresponding entry is added to a queue to be processed by a background task. The processing of the queue performs the necessary task(s) such as archiving, moving and/or renaming the target file.
Since the processing occurs almost in real-time, typically shortly after the recording completes, the destination storage location needs to be accessible at all times.
In the future, a scheduler will be added to this feature to allow archiving, moving and/or renaming to occur at pre-scheduled times/dates.
Below is a snapshot of the File Manager's page in OrkWeb.

- Uncheck the "Disable" checkbox to activate the feature.
- "Moving files" is used to move files, thus deleting them from their original location, while "Archiving" copies files to a new location, keeping the original file intact.
- Check/uncheck the "Access files from original location" checkbox, depending on whether playback of the recordings in OrkWeb is to occur based on the original file location or its new copy - valid only for archiving option.
- Select the target service where the archiving is to occur (see Config/services page for adding services).
- Edit the secondary "Pathname" field if the target file's path is
to be different from the original file's. Note that this refers only to
the secondary path not the primary path - the primary path refers to the
"File absolute path" of the service in question, e.g.
/var/log/orkaudio/audio, while the secondary path refers to the <TapeFileNaming> path configured in the recorder's config.xml. The default being a date-based hierarchy e.g. 2009/11/12/09/20091110_154500_ABC.wav. See the section called “File and Path Names” for the list of string substitutions available for path naming in OrkWeb. - Edit the "Filename" field if the file is to be renamed at the target storage location. See the section called “File and Path Names” for the list of string substitutions available for file naming in OrkWeb.
It is possible to configure the media files path and filename as a combination of the following dynamic parameters:
- [orkuid]: the unique tape UID
- [segid]: the segment ID number
- [direction]: the direction, i.e. IN, OUT, UNKNOWN
- [shortdirection]: the short representation of the direction, i.e. I, O, U
- [localparty]: the local party field, typically containing a phone number or extension
- [remoteparty]: the remote party field, typically containing a phone number or extension
- [hostname]: the hostname obtained from the service associated to the recording
- [year]: the year in 4 digit format (e.g. 2009)
- [yy]: the year in 2 digit format (e.g. 09)
- [month]: the month, in 2 digit format (e.g. 02)
- [mm]: the month, in 2 digit format (e.g. 02)
- [day]: the day, in 2 digit format (e.g. 08)
- [dd]: the day, in 2 digit format (e.g. 08)
- [hour]: the hour, in 2 digit, 24 hour format (e.g. 18)
- [min]; the minutes, in 2 digit, (e.g. 06)
- [sec]: seconds, in 2 digit, (e.g. 06)
- [group]: the parent group of the user associated to the tape's segment. NOTE: this assumes the user has only one parent group, otherwise the results are unpredictable.
Oreka's architecture was designed with foreign language support in mind.
It is thus very modular and requires minimal effort - translation of a couple of
files - to integrate a new language. The localization files are available in
OrkWeb application's folders (e.g. my.properties and
orkweb.properties for English, my_fr.properties
and orkweb.properties for French).
The following foreign languages are currently included in OrkWeb:
- English
- French
- Japanese
- Portuguese
- Spanish
For other languages, please contact <support@orecx.com>.
The selection of the OrkWeb language usually occurs automatically by default, and depends on your Operating System language. For example, if you are running the Spanish version of Windows, OrkWeb will appear in Spanish by default.
If you would like to change the displayed language, you would have to use the Language Options in your Browser as described below:
In Internet Explorer:
- Go to Tools/Internet Options
- Select Language/Add...
- Choose the language you want, and put it on top of the list
- Reload the OrkWeb page
In FireFox:
- Go to Tools/Options/Content
- Select Languages/Choose...
- Choose the language and move it to the top of the list
- Reload the OrkWeb page
Most likely, the database server is down or there is something
wrong in the database URL and credentials in the database.hbm.xml
configuration file.
- Make sure the end date in the multi-criteria search form is set correctly.
- Make sure that the recorder (orkaudio) is running correctly and is creating new recordings.
- If you are using a production license, make sure that users are properly defined in the Admin/users page. Refer to the section called “Applying OrkWeb License File”.
- If you have defined any programs in the Admin/programs page, verify that those programs are configured properly to allow the recordings that you are expecting to see.
If you fail to replay recordings through OrkWeb, here is the checklist:
- Test that the sound device is working properly by trying to play a sound or music file using any available application.
- If you are using Microsoft Internet Explorer, make sure your copy of Windows Media Player works well by opening it from the start menu and trying to replay a sample audio file.
- If you are using Mozilla Firefox, make sure you have installed Java. You can test this using the following link: http://www.java.com/en/download/help/testvm.xml
- Verify that the file you are attempting to replay is actually present
in the storage folder as configured in the recorder's
config.xmlfile. - Make sure that a correct context path is configured in Tomcat's server.xml
for the storage location of the media files. For example, if the audio files
are configured to be stored in
/var/log/orkaudio/audio(seeconfig.xml), ensure that Tomcat's$tomcat/conf/server.xmlcontains an entry such as:<Context path="/audio" docBase="c:/oreka/audio/" ></Context> - If the file is present, try to replay it locally with a media player such as Windows Media Player. If it does not replay, please refer to the section called “Not possible to replay recorded files”
You need to add at least one login string for the user. Users can log into OrkWeb using any of the login strings they own. For more details, please refer to the section called “Login Strings”
This is not the recommended installation procedure.
Orkaudio comes in two different packagings under Linux : automatic
installer (.sh file extension) and RPM archive (.tar file extension).
The automatic installer is the recommended way of installing the software.
It comes as a single file named e.g.
orkaudio-1.2-6560-x1459-i386.centos5-installer.sh.
To install it, refer to the section called “On Linux”
While the automatic installer works well on CentOS and RHEL, it may not be suited for other RPM-based distributions. If you run into errors with it, you can always proceed to a manual installation by extracting the .rpm files from it, and installing them manually. The procedure is described below.
To extract the .rpm files, run the installer. At the first question, exit by pressing CTRL-C. This will create a subdirectory under /tmp with all the required rpm files. You can then proceed as follows:
yum install boost-develyum install libpcaprpm -i xercesc-2.7.0-1.i386.rpmrpm -i ace-5.5.8-1.centos5.i386.rpmrpm -i log4cxx-0.9.7-1.i386.rpmrpm -i libsndfile-1.0.13-1.i386.rpmrpm -i orkbasecxx-1.2-660.i386.centos5.rpmrpm -i intel-ipp_rti-5.0p.x32.rpmrpm -i orkaudio-1.2-660.i386.centos5.rpmrpm -i --nodeps orkaudio-addons-1.2-1459.i386.centos5.rpm
Copy the orkaudio-startup-script to the /etc/init.d
directory as orkaudio. This will allow you to start and stop orkaudio either using
service orkaudio stop and service orkaudio start or
/etc/init.d/orkaudio start and /etc/init.d/orkaudio stop
This section is intended as a guideline for backing up your Oreka server. It lists all the entities or components that are involved.
Media files: the recordings are your main data. They are stored under the <AudioOutputPath> folder as configured in the recorder's
config.xmlfile.Database: contains the metadata about the media files. For mysql, you can back up using
mysqldump -root -p<password> <database_name> > orekadb.sql
where database_name is the name of the database, usually "oreka" in Linux, and "test" in Windows.
Configuration files: both OrkAudio's and OrkWeb's. Refer to the section called “Configuration Files” and the section called “OrkWeb/OrkTrack Configuration files” for the files' locations.
Log files (if necessary): both OrkAudio's and OrkWeb's. Refer to the section called “Log Files” and the section called “OrkWeb/OrkTrack Log files”
Customizations (if necessary): if you have made any customizations, make sure to back them up. These may include Tomcat configuration changes, web interface-related tweaks, etc.
Oreka software: ensure that you have a copy of the Oreka software or access to the website where the Oreka software was made available to you.
Oreka addresses security issues at many different levels. Below is a summary:
Secure access to the recordings, i.e. access by simple URL can be prohibited in general and allowed only for valid users who are logged into OrkWeb. Configuration changes are required to activate this functionality.
Encryption: : OrkAudio may be configured to encrypt files, and OrkWeb configured to decrypted them for playback. Files would thus be played back only through OrkWeb.
Secure access to the application using SSL (https access).
Authentication Rules for user login access such as locking s user after a given number of unsuccessful login attempts, and password rules for ensuring a minimum level of difficulty in passwords.
For more information, please contact <support@orecx.com>.
Table of Contents
- GSM 6.10 Codec
GSM 6.10 is an audio codec optimized for voice. It is the default storage codec for Oreka (wrapped into a wav file). It is used in the majority of the cellular networks worldwide and has a compression rate of 13 Kbit/s. When wrapped into a wav file it uses roughly 1.6 KByte of disk space per second of recorded audio. This means it's almost ten times more compact than MP3 format at standard compression rate. The advantage of this format is its ubiquity. It is possible to replay it in almost any existing Windows or Linux media player without installing any extra software or codec.
- mcf file
Media Capture File format. It contains raw dumps of voice buffers in their original wire encoding. The file extension is ".mcf". This is an intermediate capture file format used before sessions are transcoded to their final storage format.
- Wildcard character
A wildcard character can be used to substitute for any other character or characters in a string. The asterisk character (*) substitutes for any zero or more characters. The question mark (?) substitutes for any one character.